
A brand-new* crochet technique, first unveiled in the Just Because Cowl (click here to be taken to pattern), which uses Foundation Crochet as the ending edge of a project. (Gasps of amazement and delight resound across the crochet world. Or, alternatively, yawns and comments such as "Another bizarre stitch from that Micawber gal. Why can't she make a nice granny square for a change?") :)
Here's an example of Mirrored Foundation Half-Double Crochet (Mfhdc), added to a crochet swatch:
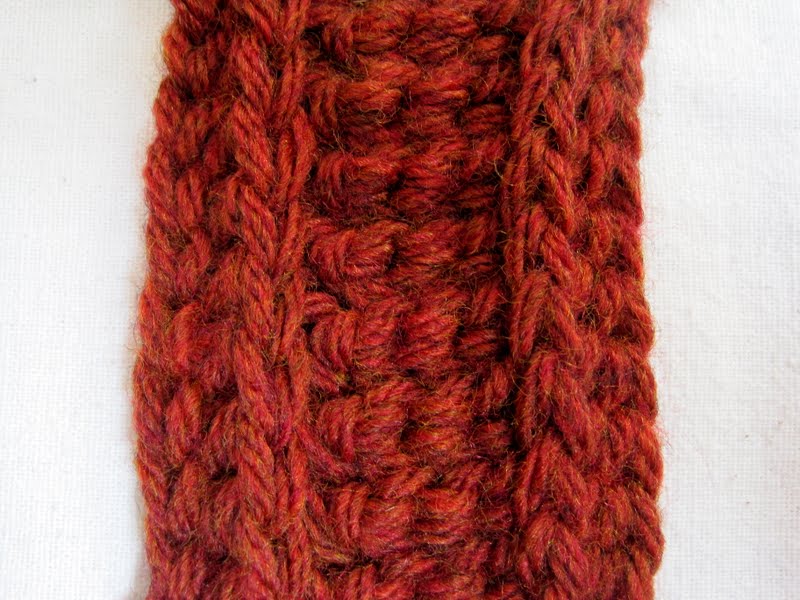 |
| Fhdc and Mfhdc, foundation stitch twins |
Like its twin Foundation Half Double Crochet, the Mfhdc is stretchy, sturdy, and decorative. It makes a perfect ending for a project that was started with regular fhdc, or any project for which you'd like a handsome finish.
But - and there's always a but - Mirrored Foundation Stitches cannot be added to a normal crocheted edge. They must be worked into a series of live loops, which makes them ideal for edging knitted projects. Does this mean that crocheters get left out of the loop? Not at all. (Audience groans at the dreadful yarny pun.)
To use the Mfhdc as an edging for crochet fabric, simply pick up a row of loops from your last crocheted row, place them on a holder of some sort, and work the Mfhdc as instructed.
(To use as an edging for knitted fabric, end with a right side row, then use the loops you already have on your needle.)
Here's an example:
 |
| A sample swatch with traditional fhdc as the starting row, followed by a row of linked trebles. Now it's time to finish up with a row of Mrs. M's Mfhdc. |
To pick up the loops from a crocheted edge, you'll need:
- a knitting needle the same size as your crochet hook, with or without cable, OR
- a crochet hook the same size as your project crochet hook, with or without cable, OR
- a Tunisian hook.
Here's how to pick up the loops for an ending row of Mirrored Foundation Stitch (I used a crochet hook, but a knitting needle works just as well):
 |
| Start at the end of a wrong-side row. Do not chain for turning. Turn work so right side is facing you. Insert hook or needle in working crochet loop, then, beginning in second st, *insert hook or needle from front to back, under BOTH strands of stitch. Yarn UNDER, pull through, and keep loop on hook or needle. Repeat from * to end of row. |
Note: Yarning UNDER is very important - if you yarn over, your loops will be twisted and not as stretchy.
 |
| Here are my loops, all picked up. Since I need to use that crochet hook to stitch the edging, I'll transfer the loops to something else. |
Here's how to make an Mfhdc edge (instructions for single and double variations will follow):
Turn the work so that the wrong side is facing you.
To start, insert crochet hook purlwise into last pulled-up loop (or knit stitch), pull stitch off holder (stitch is now your working loop), cast on 2 backward loops onto crochet hook above working loop, yarn over, pull hook through top loop, yarn over, pull through all loops on hook. Starting Mfhdc complete.
To continue, *insert hook purlwise through next stitch on needle, pull stitch off needle, yarn over, insert hook into top two strands of previous Mfhdc, pull up loop, chain 1 (4 loops on hook), yarn over, pull through all loops on hook. Repeat from *.
(Purlwise means that the tip of your working crochet hook should be pointing away from the tip of your knitting needle or cable, and inserted into the front of the stitch. The knitting needle or cable should be behind the working crochet hook.)
Here's a video from the Just Because Cowl pattern post, showing how the Mfhdc is made:
(As long as you have a series of loops ready to use, the steps are the same for knitted or crocheted fabric.)
And here's how my mini swatch looks after completing several Mfhdcs on a crocheted fabric:
 |
| Notice the decorative little ridge. |
You can also make a Mirrored Foundation Single Crochet edging, as in this (knitted) swatch:
 |
| I like how the Single version mirrors the little ripples of stockinette stitch. |
To make the Single variation: When your row of loops is complete, turn work so wrong side is facing. Slip the first stitch purlwise onto your crochet hook, as instructed above. Cast on 1 backward loop only to crochet hook; yo, pull through 1 loop, yo, pull through both loops. *Slip next stitch purlwise from needle, then insert hook under top 2 strands of previous Mf stitch, pull up a loop, chain 1, yo, pull through all loops on hook. Rep from * to end of row.
Now let's look at a sample of Mirrored Foundation Double Crochet:
 |
| Another set of twins: Fdc and Mfdc |

For Double variation: When your row of loops is complete, turn work so wrong side is facing you. Slip the first stitch purlwise onto your crochet hook, as instructed above. Cast on 2 backward loops to crochet hook, yo, pull through 1 loop, (yo and pull through 2 loops) twice. *Slip next stitch purlwise from needle, yo, insert hook under top 2 strands of previous Mf stitch, pull up a loop, chain 1, yo, pull through 2 loops, yo, pull through 3 loops. Repeat from * to end of row.
Some Helpful Tips:
All Mirrored Foundation stitches create a little ridge where the project meets the edging. When applied to a knitted fabric, working from the wrong side, the ridge will form on the right side of the project. When applied to crochet fabric, the ridge will form on both sides - which means you could actually start your Mf row with either RS or WS facing.
For matching edges on a crochet project, start the project with a row of traditional fhdc or fdc, then stitch your next row into the back horizontal bar of each stitch (not through the top two strands). This will tilt the top two strands forwards, mimicking the decorative ridge that will later be formed by the Mf edge. (No special steps are needed for knitted projects; picking up and knitting your first knit row through the top two strands will cause the ridge to form naturally.)
You may find that your Mirrored Foundation stitches are looser than your original foundation stitches. If this is a problem, decrease by one hook size.
How about Tunisian crochet?
Tunisian crochet is a natural for Mirrored Foundation stitches. Since you're already picking up loops on every row, you can simply replace the final return pass with a row of Mf stitches.
Note: remember to yarn under when picking up the loops for the Mf border. Once your loops are all picked up, switch to a smaller hook for the Mirrored stitches.
 |
| A little swatch of Tunision Simple Stitch... |
 |
| ...all finished off with a decorative row of Mrs. M's Mfhdc. (Notice that I used a smaller hook for the Mf row.) |
So there you have it - a new way to use foundation stitches as a decorative and stretchy ending row, for projects both knitted and crocheted.
Here are some suggested uses for Mirrored Foundation Stitch:
- Use to bind off a pair of toe-up socks (knitted or crocheted)
- Give a stretchy finishing edge to a garment neck or hem
- Combine with starting foundation stitches on side-to-side projects, for truly matching edges
- Use as an elegant substitute for crochet ribbing
- Make a comfortable, stretchy band on a top-down hat
How would you use this stitch? Feel free to leave a suggestion below - I'd love to hear your ideas.
You are welcome to share the technique for Mirrored Foundation Stitches, but please be courteous and credit the author.
Thanks for viewing, and happy crocheting!
~ ~ ~ ~ ~ ~ ~ ~ ~ ~ ~ ~
*At least I think it's brand-new. I've never seen it anywhere else. :)
~ ~ ~
~ ~ ~
You make the BEST tutorials ever!!!
ReplyDeleteAw shucks. Thanks Astri! :)
DeleteLovely. Thank you very much!
ReplyDeleteYou're welcome, and thanks for commenting! :)
Deletecan't wait to try this, am going to make up some swatches tomorrow. You are a genius!
ReplyDeleteThanks, Deborah - I feel like there's even more potential in this technique than what I've covered so far. Let me know how it works for you! :)
DeleteGosh, all seems rather advanced for me! When (if) I get to that level of crochet I'll be returning to use your tutorials I'm sure. Very nice of you to share!
ReplyDeleteThank you, Anne. It all grew out of my desire to add some crochet to a knitted cowl, and wanting the edges to match. :)
DeleteThank you for sharing your expertise with us Sue, I'm filing this away for the future, I am making a tunisian afghan at the moment and I'm finding it very soothing to do. :)
ReplyDeleteTunisian is soothing, isn't it? I need to make more projects with it. Have you seen Astri's Rockman Afghan (at Apple Blossom Dreams)? Great stash-busting project. ;)
DeleteSue, you are my crochet idol, great information. Stay warm.
ReplyDeleteMeredith
Gosh, that's humbling. Thanks, Meredith! Stay ... temperate. :)
DeleteOh, you clever thing. I think we shall have to make you an honorary goat. :)
ReplyDeleteI'm not worthy! I'm not worthy! I'm not worthy! :)
DeleteHow DO you figure these things out? I could never. You amaze me. Keep stitchin.
ReplyDeleteThanks for sharing and making such great tutorials.
Thanks Beth! I certainly plan to keep stitchin'. :)
DeleteVielen Dank. Ich weiss gar nicht wann ich das alles ausprobieren soll. Einfach toll.
ReplyDeleteIch schaue gerne hier rein.
Liebe Grüße
Gerlinde
Danke, Gerlinde! :)
DeleteAmazing, fantastic, extraordinaire. Thank you.
ReplyDeleteYou're welcome! Thanks for commenting. :)
Delete