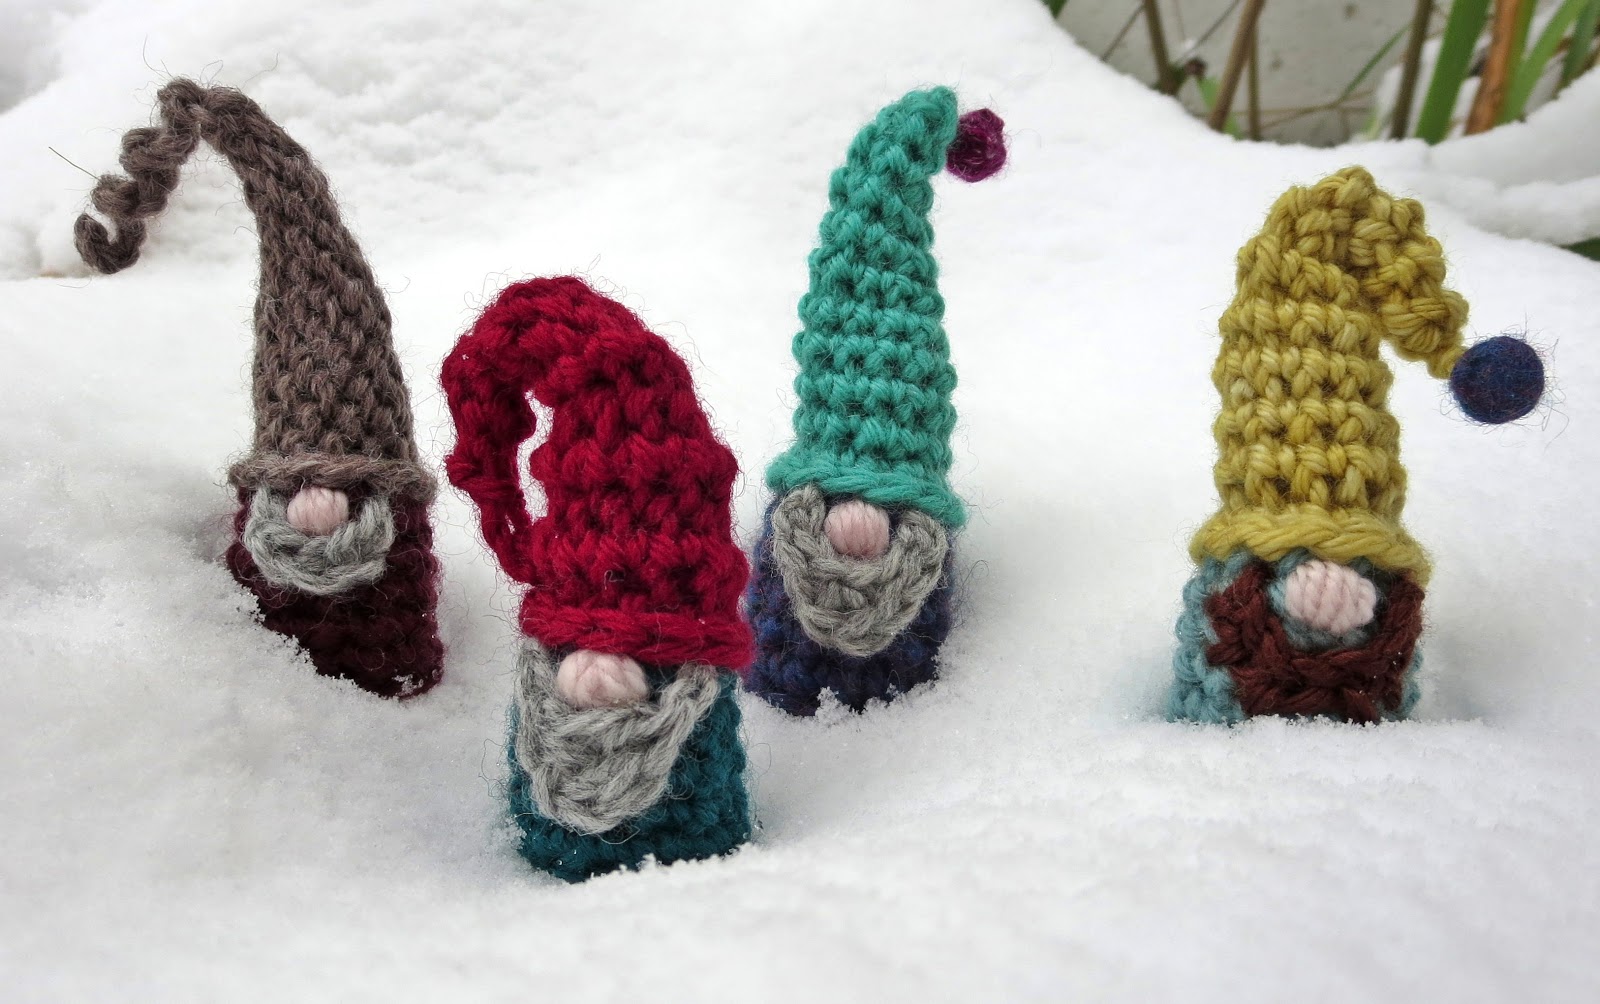
Ever heard of Gnomevember, or a Gnome-a-Long? I hadn't, until a few weeks ago. But as soon as I saw those words, I gnew I had to make a gnome of my own. The first one was so much fun, I made another, then another, and before I gnew it I had a quartet.
~ ~ ~
Introducing the Gnomes of the Gnorth:

The Gnomes of the Gnorth, you may be interested to know, are a gnoteworthy gnome folk group. Their given gnames are actually Krossby, Nils, Gnash, and Young - but to avoid being confused with a similarly-titled human ensemble, they prefer to use their stage gname in public.
 |
| One of their many album covers |
Like many musicians from gnorthern climes, these Gnomes love to tramp through the snow and sing. Last week I heard them crooning one of their greatest hits ("Just a Song Before I Gnome") as they crossed the chill expanse of the back yard:

There's gnothing like a gnome (especially a singing one) to bring a smile to your face on a dreary Gnovember day!
If you'd like to turn Gnovember into Gnomevember, here's a pattern for you. But be forewarned: these little guys are addictive.
~ ~ ~
Gnomes of the Gnorth Pattern (Videotutorial available here!)
Size: Approximately 3 1/2" tall
Yarn Requirements: Worsted weight yarn, 5-6 yards each for body and hat; 12" for nose; 1 yard for beard. Yarn scraps for stuffing.
Yarns I Used: Bodies and hats - Cascade 220, Knit Picks Wool of the Andes, Zealana Heron. Noses were made with Manos del Uruguay Gloria, and beards with varying scraps from my stash.
Hook Size: US H/5mm
Recommended stitch tension: Moderate to firm for sc or dc; relaxed for sl st.
Gnotions: Embroidery gneedle
All crochet terminology is American.
~ ~ ~
Gnotes
- Gnomes of the Gnorth are worked in spiral rounds, with RS facing at all times.
- For best appearance, stuff with matching or similar color yarn scraps (or a dark neutral).
- Do not stuff gnome until you've completed at least one hat round.
Special Terms
BB: Back bar (also called the 3rd loop; in this pattern, it's the strand of yarn that runs across the back of the YoSS, just behind and below the back lp).When combined with stitch name (eg BB sc), work the specified stitch into the BB of the stitch below.
BL, BLO: Back loop, Back loop only. When combined with stitch name (eg BLO sl st), work the specified stitch into the BL of the stitch below.
SLJ: Slip Loop Join. Remove hook from lp, insert hook from WS to RS through indicated st, replace lp on hook, draw lp through st, tighten yarn to make join "disappear".
YoSS: Yarnover Slip Stitch. Yo, insert hook into indicated st, yo and pull through all lps on hook.
Body
With body color yarn, make a magic ring (magic loop/magic circle/adjustable loop), ch 1 to exit ring.
BB: Back bar (also called the 3rd loop; in this pattern, it's the strand of yarn that runs across the back of the YoSS, just behind and below the back lp).When combined with stitch name (eg BB sc), work the specified stitch into the BB of the stitch below.
BL, BLO: Back loop, Back loop only. When combined with stitch name (eg BLO sl st), work the specified stitch into the BL of the stitch below.
FL, FLO: Front loop, front loop only. When combined with stitch name (eg FLO sc), work the specified stitch into the FL of the stitch below.
Forward Lp: Twist yarn to form a shape like a letter "p", with yarn tail in the back; insert hook from back to front through lp, pull tail to tighten lp on hook.
Decr in FL overlap of 2 sts: Insert hook into FL of next st, then into FL of 2nd st from hook, make indicated st. (Be careful to skip the 2nd st used when making the next st after a decrease.)Forward Lp: Twist yarn to form a shape like a letter "p", with yarn tail in the back; insert hook from back to front through lp, pull tail to tighten lp on hook.
SLJ: Slip Loop Join. Remove hook from lp, insert hook from WS to RS through indicated st, replace lp on hook, draw lp through st, tighten yarn to make join "disappear".
YoSS: Yarnover Slip Stitch. Yo, insert hook into indicated st, yo and pull through all lps on hook.
Body
With body color yarn, make a magic ring (magic loop/magic circle/adjustable loop), ch 1 to exit ring.
Round 1 (RS): Ch 2 (does gnot count as stitch), 12 dc in ring. Do gnot turn. If desired, place marker in first dc of round to help identify it later.
Round 2: Sl st in each dc around, SLJ (see Special Terms) to first sl st of round, ch 1 tightly.
Round 3: Working into the dcs from Round 1, beginning in dc behind first sl st, sc in each dc around. 12 sc
Rounds 4-6: Continuing in spiral rounds, FLO sc in each st around.
Round 7: FLO sc in next 10 sc, loosely sl st in next 2 sc. If you plan to use yarn scraps for stuffing, fasten off now. If using Optional Self-Stuffing below, do gnot fasten off.
Optional Self-Stuffing: SLJ to next st, ch 1 tightly, loosely ch 75, fasten off.
Stretch the body all the way around to create a smooth, even tube. Don't worry if the base bulges outwards - you can flatten it later.


Hat
Gnomes of the Gnorth hats come in three different stitch patterns: front loop only single crochet, front loop only slip stitch, or a combination of the two.
Whichever version you choose will yield a tall pointy hat that you can style any way you like. You can leave it plain, or add a bobble or chain curlicue to the tip; stitch it down to one side, or let it stand up.

Round 1, All Hat Styles:
To join new yarn, insert hook into final sl st of Body Round 7, pull up a loop of hat color yarn, leaving a 4" tail. With tail, make a forward lp (see Special Terms) on hook above working lp (2 lps now on hook). Bring tail over working yarn, yo with working yarn and pull through both lps on hook (counts as YoSS). YoSS in each remaining st around, SLJ to first st. 12 YoSS
Lightly stuff gnome with yarn scraps or optional self-stuffing chain, keeping base flat. If base starts to round outwards, push upwards on it with your thumbs to flatten it and move the stuffing farther up into the body.
After stuffing, continue with your chosen hat style below.
Sc Hat
Round 2: Continuing in spiral rounds, BB sc in each st around (see Special Terms). Working into the BB will make the top lps of Round 1 tip outwards, forming a chain-like brim for the hat. 12 sc
Round 3: FLO sc in each st around.
Round 4: Sc decr in FL overlap of next 2 sts (see Special Terms), skip 2nd sc used, FLO sc in each remaining st around. 11 sc
Rounds 5-11: Repeat Round 4, decreasing 1 sc each round until you have 4 sc left. As hat grows taller, add a little more stuffing if desired to support lower hat rounds.
Round 12: (Sc decr in FL overlap of next 2 sts) 2 times.
For plain or bobble-trimmed hat, fasten off, leaving a 6" tail.
For curlicue, do gnot fasten off.
Slip Stitch Hat
Round 2: Continuing in spiral rounds, with relaxed tension (here and throughout), BB sl st in each st around (see Special Terms). Working into the BB will make the top lps of Round 1 tip outwards, forming a chain-like brim for the hat. 12 sl st
Round 3: Sl st decr in FL overlap of next 2 sts (see Special Terms), skip 2nd st used, FLO sl st in each remaining st around. 11 sl st
Round 4: FLO sl st in each st around.
Round 5: Sl st decr in FL overlap of next 2 sts, skip 2nd st used, FLO sl st in each remaining st around. 10 sl st
Round 6: FLO sl st in each st around.
Rounds 7-13: Repeat Round 5, decreasing 1 sl st each round until you have 3 sl st left. As hat grows taller, add a little more stuffing if desired to support lower hat rounds.
Round 14 (may be worked with a smaller hook if desired): FLO sl st in next 3 sts.
For plain or bobble-trimmed hat, fasten off as follows: cut yarn, leaving a 6" tail, pull yarn up and out of stitch. Insert hook from RS to WS of previous stitch, pull yarn tail through and tighten.
For curlicue, do gnot fasten off.
Combination Hat
Round 2: Continuing in spiral rounds, with relaxed tension (here and on all sl st rounds), BB sl st in each st around. Working into the BB will make the top lps of Round 1 tip outwards, forming a chain-like brim for the hat. 12 sts
Round 3: FLO sc in each st around.
Round 4: Sl st decr in FL overlap of next 2 sts, skip 2nd st used, FLO sl st in each st around. 11 sl st
Round 5: Sc decr in FL overlap of next 2 sts (see Special Terms), skip 2nd st used, FLO sc in each st around. 10 sc
Rounds 6-12: Repeat Rounds 4-5, alternating sc and sl st rounds, decreasing 1 st each round until you have 3 sts left. As hat grows taller, add a little more stuffing if desired to support lower hat rounds.
Round 13: (Sl st decr in FL overlap of next 2 sts) 2 times.


Trim Options
Round 3: Working into the dcs from Round 1, beginning in dc behind first sl st, sc in each dc around. 12 sc
Rounds 4-6: Continuing in spiral rounds, FLO sc in each st around.
Round 7: FLO sc in next 10 sc, loosely sl st in next 2 sc. If you plan to use yarn scraps for stuffing, fasten off now. If using Optional Self-Stuffing below, do gnot fasten off.
Optional Self-Stuffing: SLJ to next st, ch 1 tightly, loosely ch 75, fasten off.
Stretch the body all the way around to create a smooth, even tube. Don't worry if the base bulges outwards - you can flatten it later.


Hat
Gnomes of the Gnorth hats come in three different stitch patterns: front loop only single crochet, front loop only slip stitch, or a combination of the two.
Whichever version you choose will yield a tall pointy hat that you can style any way you like. You can leave it plain, or add a bobble or chain curlicue to the tip; stitch it down to one side, or let it stand up.

Round 1, All Hat Styles:
To join new yarn, insert hook into final sl st of Body Round 7, pull up a loop of hat color yarn, leaving a 4" tail. With tail, make a forward lp (see Special Terms) on hook above working lp (2 lps now on hook). Bring tail over working yarn, yo with working yarn and pull through both lps on hook (counts as YoSS). YoSS in each remaining st around, SLJ to first st. 12 YoSS
Lightly stuff gnome with yarn scraps or optional self-stuffing chain, keeping base flat. If base starts to round outwards, push upwards on it with your thumbs to flatten it and move the stuffing farther up into the body.
After stuffing, continue with your chosen hat style below.
Round 2: Continuing in spiral rounds, BB sc in each st around (see Special Terms). Working into the BB will make the top lps of Round 1 tip outwards, forming a chain-like brim for the hat. 12 sc
Round 3: FLO sc in each st around.
Round 4: Sc decr in FL overlap of next 2 sts (see Special Terms), skip 2nd sc used, FLO sc in each remaining st around. 11 sc
Rounds 5-11: Repeat Round 4, decreasing 1 sc each round until you have 4 sc left. As hat grows taller, add a little more stuffing if desired to support lower hat rounds.
Round 12: (Sc decr in FL overlap of next 2 sts) 2 times.
For plain or bobble-trimmed hat, fasten off, leaving a 6" tail.
For curlicue, do gnot fasten off.
Slip Stitch Hat
Round 2: Continuing in spiral rounds, with relaxed tension (here and throughout), BB sl st in each st around (see Special Terms). Working into the BB will make the top lps of Round 1 tip outwards, forming a chain-like brim for the hat. 12 sl st
Round 3: Sl st decr in FL overlap of next 2 sts (see Special Terms), skip 2nd st used, FLO sl st in each remaining st around. 11 sl st
Round 4: FLO sl st in each st around.
Round 5: Sl st decr in FL overlap of next 2 sts, skip 2nd st used, FLO sl st in each remaining st around. 10 sl st
Round 6: FLO sl st in each st around.
Rounds 7-13: Repeat Round 5, decreasing 1 sl st each round until you have 3 sl st left. As hat grows taller, add a little more stuffing if desired to support lower hat rounds.
Round 14 (may be worked with a smaller hook if desired): FLO sl st in next 3 sts.
For plain or bobble-trimmed hat, fasten off as follows: cut yarn, leaving a 6" tail, pull yarn up and out of stitch. Insert hook from RS to WS of previous stitch, pull yarn tail through and tighten.
For curlicue, do gnot fasten off.
Combination Hat
Round 2: Continuing in spiral rounds, with relaxed tension (here and on all sl st rounds), BB sl st in each st around. Working into the BB will make the top lps of Round 1 tip outwards, forming a chain-like brim for the hat. 12 sts
Round 3: FLO sc in each st around.
Round 4: Sl st decr in FL overlap of next 2 sts, skip 2nd st used, FLO sl st in each st around. 11 sl st
Round 5: Sc decr in FL overlap of next 2 sts (see Special Terms), skip 2nd st used, FLO sc in each st around. 10 sc
Rounds 6-12: Repeat Rounds 4-5, alternating sc and sl st rounds, decreasing 1 st each round until you have 3 sts left. As hat grows taller, add a little more stuffing if desired to support lower hat rounds.
Round 13: (Sl st decr in FL overlap of next 2 sts) 2 times.
For plain or bobble-trimmed hat, fasten off, leaving a 6" tail.
For curlicue, do gnot fasten off.
For curlicue, do gnot fasten off.


Trim Options
Curlicue: With a smaller hook, very tightly chain 12-15 (chain should curl naturally). Fasten off tightly. You can either weave in the tail (gnote: this may relax the curl); trim and felt the end to the tip; or trim and leave a short tail.
One-Round Sc Bobble: Make a magic ring, leaving a 4" tail. Sc 7 in ring. Tighten starting tail to close center of ring. Cut working yarn, leaving a 6" tail, and pull this tail up and out of final sc. Starting in first sc, weave the 6" yarn tail from WS to RS of each stitch around, pulling it all the way through on each stitch, ending with the final sc. Slowly tighten this tail to roll the stitches upward and gather them into a ball, keeping the RS of stitches on the outside of the ball and the starting tail on the inside (with the end coming up out of the center). When the stitches are firmly gathered, roll the ball between your fingers to get the shape you like. Tighten both tails once more, then knot them together close to the ball. Thread one tail on an embroidery gneedle and sew back and forth through bobble to secure the end. Repeat with other tail. Trim both tails very close to ball. (You will use the hat yarn tail to attach the bobble.)

Other trim ideas: Small bell, felted ball, tiny acorn, tiny pompom.

Other trim ideas: Small bell, felted ball, tiny acorn, tiny pompom.
Add a Gnose
With gnose color yarn threaded on embroidery gneedle, using satin stitch, embroider a gnose just below hat brim, on opposite side of body from round joins.
To embroider my gnome gnoses, I passed the gneedle up through the center of the dc base, leaving a short tail outside the body, and exiting with the gneedle just below the hat brim. I made 3 stitches close together to serve as a base layer. To secure the gnose yarn in place, I pierced it with the gneedle on the WS while making the first stitch or two (hope that makes sense). Then I added extra layers of satin stitch until I was happy with the size and shape of the gnose. I wove in the long yarn tail as described in Tips for Weaving in Ends (below), and trimmed the short tail very close to the dc stitches.
To embroider my gnome gnoses, I passed the gneedle up through the center of the dc base, leaving a short tail outside the body, and exiting with the gneedle just below the hat brim. I made 3 stitches close together to serve as a base layer. To secure the gnose yarn in place, I pierced it with the gneedle on the WS while making the first stitch or two (hope that makes sense). Then I added extra layers of satin stitch until I was happy with the size and shape of the gnose. I wove in the long yarn tail as described in Tips for Weaving in Ends (below), and trimmed the short tail very close to the dc stitches.

Make and Attach Beard
Here are just a few ideas for making your gnome's beard. Feel free to improvise and make up your own!
Gnote: Leave a 6-8" tail at each end of beard. To attach beard to gnome, thread one tail on an embroidery gneedle. Sew into body of gnome on one side of gnose, just under hat brim, then sew in and out around curve of beard to tack it down. Thread other tail on gneedle, sew into body on other side of gnose, and make one small stitch through beard to secure. Weave in both ends (see Tips for Weaving in Ends below).
Simple Chain Beard: Working loosely, Knotless Chain 6, fasten off loosely. Use yarn tails to tack beard to face as described above. Chain may be attached with either side facing outwards.
Embellished Chain Beard: Make a Simple Chain Beard and tack it down with spiky stitches that ray out from the beard.
Slip Stitch Beard: Knotless Chain 7, turn. Starting in 2nd ch from hook, BLO sl st in each ch across. Fasten off.
Longer Rounded Beard: Knotless Chain 6, turn. Working into the back bumps of chain, dc in 3rd ch from hook; insert hook into same back bump, then into next back bump, dc; ch 2, fasten off loosely.

Tips for Weaving in Ends
For best results, I used a sharp-tipped embroidery gneedle to weave in ends.
Hat tail: after adding trim, I took the yarn tail through the center of hat tip, out and around top strand of tip, then wove it down through hat and body as explained below.
Gnose and beard yarn tails: I wove these in by sewing them all the way through the body or hat, then turning around and sewing back in the other direction (without visibly catching any stitches on the outside), making 3 or 4 passes through hat or body at different angles. (If you use this method, do gnot tug too hard on the yarn tail while sewing back and forth, as doing so may distort the gnome.)
To finish, I trimmed the yarn close to the body (or hat), and gently pulled the surrounding stitches outward to make the cut end disappear inside the gnome.
~
You may do whatever you like with the items you make from this pattern, but you may not sell the pattern, or reproduce its text without permission. (Links to this post are welcome.) If you make any gnomes for sale, crediting the designer would be a kindness.
If you have any questions about this pattern, or find any mistakes (it happens all the time!), feel free to ask or tell in the comment box below.
Happy Gnomevember!

~ ~ ~ ~ ~ ~ ~ ~ ~ ~ ~ ~
You may do whatever you like with the items you make from this pattern, but you may not sell the pattern, or reproduce its text without permission. (Links to this post are welcome.) If you make any gnomes for sale, crediting the designer would be a kindness.
If you have any questions about this pattern, or find any mistakes (it happens all the time!), feel free to ask or tell in the comment box below.
Happy Gnomevember!
~ ~ ~ ~ ~ ~ ~ ~ ~ ~ ~ ~