
In the last post, we gathered our supplies and practiced making Forward Loop Chains and Limpets.
Now that we've completed these preliminary flourishes, let's get started on our Mitts.
All crochet terminology is American.

Limpet Mitts Pattern
The Limpet Mitts are worked top-down. Project starts flat, is joined after Row 2, then worked in the round for the remainder of the pattern. Thumb gusset is worked in one with the body of the mitt, decreasing gradually towards the wrist. (Thumb gussets and body will be worked in Part 2.)
Size: 6½", 7¼", 8", 8¾" palm circumference x 5½"-7½" length OR custom size (see Pattern Row 1 for instructions on custom sizing the circumference)
Yarn Requirements: approximately 100-125 yards DK/light worsted weight (#3) yarn (more for very large mitts)
Yarn I Used: Plymouth Yarn Select DK Merino Superwash, 1017 Cilantro and 1131 Turquoise
About the Yarn: Plymouth DK Merino Superwash is a heavier DK - I would call it a light worsted. It's very sproingy, though being an S-twist it can get splitty as the motion of crochet causes it to untwist. But the yarn is very forgiving and can stand up to repeated frogging. It gives beautiful stitch definition and a cushiony fabric.
Gauge: 5 stitches and 4 rows = 1" in half-double crochet (Note: if you're making mitts for yourself, gauge is not important - you can try them on as you go)
Notions: Darning needle; 2 stitch markers (optional)

Abbreviations and Special Terms Used:
RS - Right side
WS - wrong side
Ch - Chain
Sc - single crochet
Hdc - half double crochet
Forward Loop - a cast-on loop borrowed from knitting which is the first step of every Forward Loop Chain and Limpet. (See the Limpet Mitts Warmup post for photo and video tutorial.)
Forward Loop Chain - cast on 1 Forward Loop, yarn over, and draw through both loops on hook. (See the Limpet Mitts Warmup post for photo and video tutorial.)
Forward Loop Hdc Picot - Forward Loop Chain 1, then yarn over, insert hook into back ridge, yarn over and pull up a loop, yarn over and draw through all loops on hook. (See also photos and video below.)
Limpet - cast on 5 Forward Loops, insert hook into indicated stitch, yarn over and pull up a loop, yarn over and draw through all loops on hook. (See also photos and video below.) Limpets are worked on WS rows only. Always followed by "locking" stitch.
Slipped Slip* Join - drop working loop from hook; keeping yarn behind work, insert hook from wrong side to right side through top two strands of first stitch of row; pull working loop through and tighten until join disappears. Chain as instructed to begin new round.
(Video and Phototutorials follow the pattern.)
Row 1 (RS): Make Forward Loop Hdc Picot: *Forward Loop Chain 1, hdc in back bump without turning work (picot made). Repeat from *until you have 17 (19, 21, 23) clusters, OR a strip long enough, when stretched slightly, to fit around the base of your fingers.
Note on custom sizing: The picot row sets the stitch count for the rest of the cuff. Use this chart to calculate your stitch count for the rest of the cuff rows:
If Row 1 has 15 picots, Rows 2-8 should have 29 stitches.
16 picots ... 31 stitches
17 picots ... 33 stitches
18 picots ... 35 stitches
19 picots ... 37 stitches
20 picots ... 39 stitches
21 picots ... 41 stitches
22 picots ... 43 stitches
23 picots ... 45 stitches
24 picots ... 47 stitches
Row 2 (RS): Do not turn. Rotating work to right (or to left if you're a lefty), chain 1 (does not count as stitch), sc in "hole" made by back bump, *chain 1, sc in next "hole". Repeat from * across = 33 (37,41,45 OR custom number) stitches. Note: Make sure you are stitching into the "bottom" of the picot stitches. Your scs should be made in the same "holes" that the hdcs were made in.
Bring ends together to form a ring, RS facing outwards. Join with Slipped Slip Join (see Special Terms above; photos below) to first stitch of Row 2. Be careful not to twist work. Mitt will be worked in rounds from here on.
Round 3, back loop only (RS): Do not turn; chain 1 (does not count as stitch.) Starting in same stitch, working in the back loop only, single crochet around = 33 (37,41,45 OR custom number) stitches. Join last sc to first sc with Slipped Slip Join.
Round 4, back loop only (RS): Do not turn; chain 2 (does not count as stitch). Starting in same stitch and working in the back loop only, *hdc, chain 1, skip 1 stitch. Repeat from * around, ending with hdc = 33 (37,41,45 OR custom number) stitches. Join to first hdc with Slipped Slip Join.
Round 5 (WS): Turn, chain 2. (This will be the only WS round.) Hdc in first hdc, ch 1, skip chain, *make Limpet in next hdc, chain 1 to lock limpet, skip 1. Repeat from * until 1 hdc remains in row below. Hdc in final hdc. Turn work so RS is facing you. Inserting hook from WS to RS, join final hdc to first hdc with Slipped Slip Join (join will be worked in opposite direction to previous joins.)
Note: Round 5 edited 11/28/14. Many thanks to aliothsan on Ravelry for noticing the pattern error!
Round 6 (RS): Turn, chain 2. Hdc in hdc, hdc in "hole" (chain st), chain 1. *Skip limpet, hdc in next "hole", chain 1. Repeat from * around until you have 3 stitches left in the row below (a limpet, a chain, and an hdc); skip limpet, hdc in each of the last 2 stitches. (Round starts and ends with 2 hdc in a row.) Join to first hdc with Slipped Slip Join.
Note: Mitt will be worked RS facing from here to end.
Round 7, back loop only: Repeat Round 3.
Round 8, back loop only: Chain 2. Starting in the same stitch, working in the back loop only, hdc in each stitch around. Join to first hdc with standard slip stitch = 33 (37,41,45 OR custom number) stitches.
And whew! The trickiest part is over - the rest will be fairly plain sailing. Tune in on Saturday for Part 2, when we'll finish our mitts.
P.S. Isn't it pretty so far? :)
Video Tutorial
Photo Summary (see Pattern above for detailed row instructions)
Row 1, Right Side: Make Forward Loop Hdc Picots until edging is desired length. (You can follow the suggested pattern sizes above OR customise by adding/subtracting picots.)
If you're making a custom size, please see the chart in the Note on Custom Sizing in Pattern Row 1 above - it will tell you your stitch count for the rest of the cuff rows.
 |
| Forward Loop Chain 1, hdc in back ridge. Repeat. |

Row 2, Right Side: Do not turn. Chain 1 (does not count as stitch), then work back across the strip of picots, making a single crochet in each "hole" and chaining 1 between. End with a single crochet in the final hole.
Note: Make sure you are stitching into the "bottom" of the picot stitches. Your scs should be made in the same "holes" that the hdcs were made in.
 |
| Row 2 |
Making the Slipped Slip Join: Remove hook and pull up a tall loop. Bring ends together to form a ring, RS facing outwards. Join with Slipped Slip Join to first stitch of Row 2. Mitt will be worked in rounds from here on.
 |
| Joining at end of Row 2 |
 |
| The Slipped Slip Join |
Round 3, back loop only: Do not turn; chain 1 (does not count as stitch). Single crochet around in the back loop only. Join to first sc with Slipped Slip Join.
 |
| Round 3 |
Round 4, Right Side, back loop only: Do not turn. Chain 2 (does not count as stitch). Starting in the same stitch, (hdc, chain 1, skip 1) around in the back loop only, ending with hdc. Join to first hdc with Slipped Slip Join.
 |
| Round 4 |
Note on Round 5: Edited 11/28/14 to correct error. (The video tutorial did not need correcting.)
Round 5, Wrong Side: Turn, chain 2. This will be the only WS round. Hdc in first hdc, ch 1, skip chain. *Make Limpet in next hdc, chain 1 to lock limpet, skip a stitch. (The stitch you are skipping is the chain stitch in the row below.) Repeat from * until 1 hdc remains in row below, then hdc in final hdc.
 |
| Round 5 |
After you make a few limpets, turn the work around and admire them:
 |
| Kinda cute, aren't they? |
Here we are at the end of the row, with the final hdc just made:
 |
| End of Round 5 |
Because we're working a WS row, our Join will have to be made a little differently.
Turn work so RS is facing you. Inserting hook from WS to RS, join final hdc to first hdc with Slipped Slip Join. (Join will be worked in opposite direction to previous joins.)
 |
| Joining Round 5 |
Whew! Congratulations on finishing the trickiest round of the cuff. Wipe the sweat from your brow and take a moment to try on your mitt and admire the pretty limpets. Get a fresh grip on your hook, and prepare to zip right through the next 3 rounds.
(I have a lovely photo of myself trying on the cuff at this stage - the limpets are beautiful but Round 3 is completely missing! That photo shall not be posted.) :)
Round 6, Right Side: Turn, chain 2. Mitt will be worked in the right side from here to the end.
Hdc in first hdc, hdc in the "hole" right before the limpet, then chain 1.
*Skip limpet, hdc in next "hole", chain 1. Repeat from * around until you have 3 stitches left in the row below: a limpet, a chain, and an hdc. Skip the limpet and hdc in both stitches to end.
 |
| Start of Round 6 |
 |
| Round 6 |
 |
| End of Round 6 |
Remember, Round 6 starts with 2 hdc and ends with 2 hdc. If you get to the end and your stitch count is off, it may be that you started or ended in the wrong stitch, or forgot to skip a stitch somewhere.
Note: Mitt will be worked RS facing from here to end.
Round 7, back loop only: Same as Round 3: don't turn, chain 1, sc in back loop around, join with Slipped slip Join.
 |
| Round 7 |
And now we come to ... the Final Round! Of the cuff, that is. :)
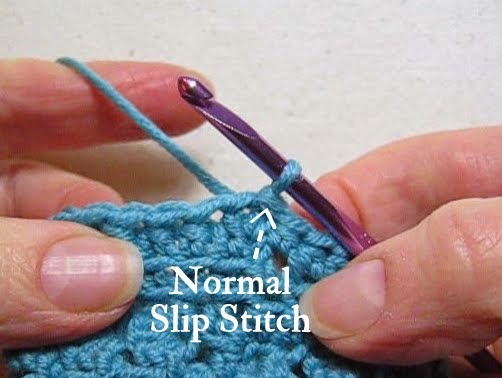
Round 8, back loop only: Chain 2. Starting in the same stitch, working in the back loop only, hdc in each stitch around. Join to first hdc with standard slip stitch.
|
| Round 8 |
And that's it for Part 1. How do you like your mitt so far? I think it's rather pretty:

If you're joining in the CAL, I'd love to see how your mitts progress. Send me a photo via email (see Profile at right for address), or reach me in Ravelry as MrsMicawber. And if you have any questions about the pattern, please don't hesitate to ask.
See you next Saturday, when we'll finish our Limpet Mitts. Until then, happy crocheting!
~ ~ ~
*I don't know if "Slipped Slip" is the official name for this join, but that's what Vashti Braha calls it. And what's good enough for Vashti is enough for me! :)
~ ~ ~ ~ ~ ~ ~ ~ ~ ~ ~ ~
It's looking great so far Sue, a great tutorial. :)
ReplyDeleteYour video helped me tremendously. Thank you, so far I'm actually doing it. I love the Limpet stitch and the cool cast on. Can't barley wait for next lesson.
ReplyDeleteI am so excited to get going on this. Not one to sit in front of my computer I printed it all off so I can have the information forever. Apparently I am not one to save trees either. I have my yarn and hook ready to go.....
ReplyDeleteHugs,
Meredith
Thank you so much for this lovely pattern. I also wanted to say thank you for going the extra, extra mile to take all the great photos and the most helpful video. You Rock, Sister...you just flat out ROCK! Love this design. :) Wishing you a most lovely day sweet friend. ((hugs))
ReplyDeleteThese mitts look really lovely.
ReplyDeleteBEEEEEUUUUUUUtiful!
ReplyDeleteWow Sue, what a great tutorial! You've really gone all out here. I can't wait to get started! This has been a great reintroduction to the world of blogging. Thanks so much for this.
ReplyDeleterosie
My son arrived from the East Coast and I can't start this now although I did practice the Limpets last week :) I love that I can come back to your directions/videos when I am able. I played and replayed the two tutorials on the Limpets and have not quite mastered the motion of pulling the new stitch, but am determined to figure out what I am missing. My mind boggles when thinking of the time and effort you have put into producing this, Sue! Thank you so much! I miss the stitching group I was part of for seven years in northern, CA, and your videos along with knowing you through our blog exchanges helps to fill that gap in my life :) xx
ReplyDeleteMrs. M..... You give the best directions. Thank you
ReplyDeleteWe DID get snow a few times today. It didn't add up to much, but it was purdy!
I think this tutorial tops all the tutes you've done! My goodness, I could do this cute stitch with my eyes closes now that you've shown me how! Great work!
ReplyDelete