Imagine a kitchen drawer full of pretty crochet dishcloths. You open the drawer and choose one, pausing to admire the fancy stitch pattern. You plunge it into soapy water and wring it out, and then reality strikes: the fancy dishcloth is now a shapeless blob, with rows of holes between the stitches. Nothing but a trip through the dryer will shrink it back into shape.
Why do so many crochet dishcloths lose their shape, or develop gaping holes? The fault, dear reader, is partly in the yarn; cotton has no recovery. But the real culprit is crochet itself.
Crochet stitches under vertical tension will naturally tighten at the base and loosen at the top. This leads to gaps between rows, and flared or misshapen edges. You can try to get around it by using shorter stitches, but even single crochet dishcloths can develop holes at the top of each row. You can try working your stitches more tightly, but that may hurt your hands. You can try special techniques like waistcoat stitch, or working two rows below, but you may end up with a dishcloth so thick it never really dries between uses. What's a crocheter to do?
This crocheter decided to design a dishcloth that simply can't stretch into gaping holes. After making many samples, and testing them for months in my own kitchen, I happily present the Solid State Dishcloth.
The Solid State Dishcloth uses a special variation of single crochet that keeps tension evenly distributed - not only within each stitch, but also between each row. Wet or dry, this dishcloth will not develop gaping holes. It also features a flexible I-cord foundation, perfectly straight sides, and a tidy slip stitch edging that helps prevent flared or distorted edges.
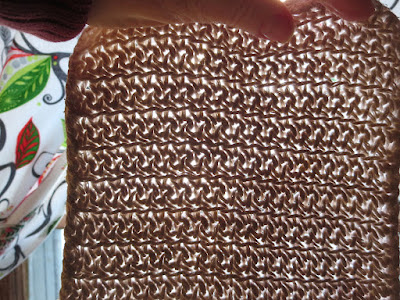
Here's one of my Solid State Dishcloths, a few months into the testing period. It's soaking wet, and has just been through a strenuous round of dishwashing and counter-wiping:
Are there gaps? Yes, but they're very small and very consistent. And the cloth has held its shape.
Can a Solid State Dishcloth ever bias, or look less-than-square? A little, when it's soaking wet - just as any sturdy cotton fabric might. But the special stitch structure, along with the edging, minimizes stretching, so it's easy to tweak the cloth back into shape for drying. If your tension is consistent when you crochet it, this dishcloth will keep its shape.
The Solid State Dishcloth won't be the fanciest dishcloth in your drawer, but it may very well be the sturdiest. To make your own, read on.
Solid State Dishcloth Videotutorial (written pattern below)
~ ~ ~
Solid State Dishcloth Pattern in Mostly Plain English
Yarn Requirements: Kitchen cotton yarn, 40-50 gm/60-85 yards
Size: Custom (I have small hands, so my dishcloths are 6" x 7" and use less than 30 gm each; yours can be any size you like)
Hook(s): Choose a hook size appropriate for your yarn (you might want to try a smaller hook than usual for the dishcloth body). Optional for edging: extra hook, one size smaller than hook used for body.
Hook Sizes I Used: US G/4.25mm for body; US F/3.75mm for edging
Recommended stitch tension: Relaxed for body; moderate for foundation row and edging
Notions: 2 stitch markers; yarn needle for weaving in ends
All crochet terminology is American.
~
Abbreviations and Special Terms
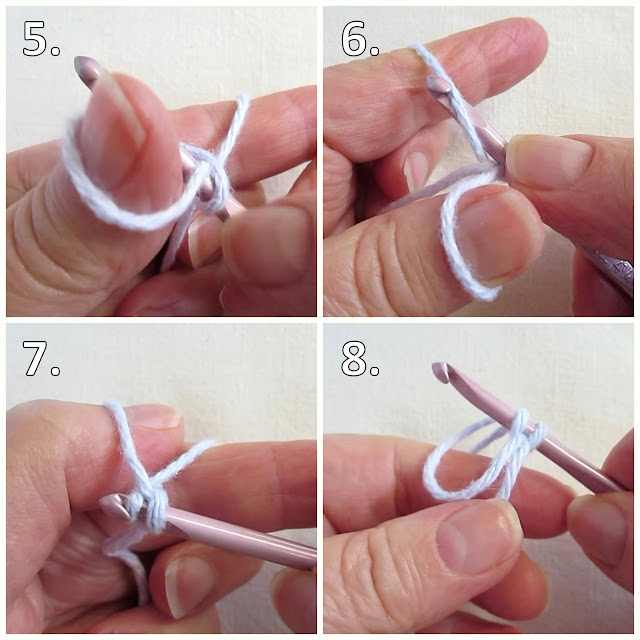
Foundation Row: To start the I-cord foundation row, make a knotless longtail cast-on as follows.
2. Place the forefinger and thumb of your non-hook hand between the tail and the working yarn.
4-5. Lift your thumb so that the tail loops up and over it. The working yarn should be looped over your forefinger. With hook, reach in front of the tail, then up through the loop on your thumb.
7. Pull the working yarn through the loop on your thumb.
8. Remove your thumb and tighten the tail.
Begin making 2-loop I-cord: *Remove your hook from the first loop (the one nearest the tip), and hold this loop's base with your thumb and finger so it can't twist. Yarn over and pull up a loop in the second loop, then re-insert hook into the first loop, yarn over and pull up a loop. (One I-cord row complete.) Repeat from * to desired dishcloth width.
 |
| Working the I-cord foundation |
Tips for I-cord: Keep tension moderate and consistent. Don't worry if your I-cord looks a bit gappy on the back side; this will go away when you crochet the first row of the dishcloth.
Finishing I-cord foundation: When I-cord is desired length, remove hook from first loop, then re-insert it from back to front. Yarn over and pull through both loops on hook. Notice that your I-cord looks like 2 columns of knit stitches. Place a marker in the topmost loop of the column nearest your hook hand; place another marker in the bottommost loop of the same column. This is the column you will be working into on the next row.
 |
| Ending the I-cord foundation |
Row 1 (WS): Chain 1. Keeping working yarn in front, twist I-cord counterclockwise (left-handed crocheters should twist clockwise) nearly all the way around, until the topmost marker is facing you, with the working yarn coming up in front. Beginning in topmost marked stitch, working with relaxed tension, sc in each stitch of marked column until 1 empty stitch remains before next marked stitch. (Be careful not to let the I-cord twist as you work. Make sure you work into the same column from start to end.) Insert hook into the empty stitch, yarn over and pull up a loop, insert hook into marked stitch, yarn over and pull up a loop, yarn over and pull through both loops on hook. Count your stitches; this will be your stitch count for the rest of the pattern.
 |
| Turning the foundation and working Row 1 |
Tips for working with relaxed tension: Consciously relax both your hands. Don't tug on the yarn at any stage of the stitch. Let the working yarn flow loosely through your non-hook hand. Another way to achieve relaxed tension is to draw up a taller-than-usual base loop (also known as the golden loop) on each sc, then yarn over and pull through both loops normally. Having a taller base loop will, by default, create a looser sc.
Row 2 (RS): Chain 1, turn work so as to keep working yarn in front (counterclockwise for right-handers, clockwise for left-handers). Working into front bar and front loop of each sc, with relaxed tension, sc in each sc across until 1 stitch remains at end of row. Insert hook into front bar and front loop of last stitch, yarn over and pull up a loop, insert hook under front bar and the loop that crosses it slightly lower down at the end of the row (together they look like an X), yarn over and pull up a loop, yarn over and pull through all loops on hook.
Tips for working into front bar and front loop: Remember to insert hook upwards, first under the front bar, then under the front loop. If you're having trouble getting the hook under both loops, try this method: find the /\ under the front bar. With the tip of your hook, catch the far edge of the farther leg of the /\, then rotate hook tip to slide it up and under the front loop and front bar.
Following Rows: Repeat Row 2 to desired dishcloth size, ending with an even-numbered row. Remember to keep a relaxed tension, keep the working yarn in front when you turn, and work the last stitch of every row into both the front loop/front bar and the little X at the row end. When you finish an even-numbered row, your hook should be at the opposite corner to the starting tail.
General tips: When working the dishcloth body, keep your overall tension as consistent as possible. Your row end stitches should be the same height as the stitches in the middle of the row. This will help your dishcloth maintain its shape during use.
Edging (RS): Chain 1, rotate work sideways. If desired, switch to a smaller hook. Working into the row ends, sl st in each row end to corner, rotate work sideways. Working into unused I-cord column, sl st in each I-cord stitch to next corner, rotate work sideways. Sl st in each row end to next corner (you may end up with 1 more sl st on this side than you did on the other), rotate work sideways. Sl st in each sc to end.
Slip stitch edging tips: Use moderate, consistent tension; don't work too tightly, or the edges will pucker.
Invisible join: Cut yarn, leaving a 6" tail. Gently pull yarn tail up and out of stitch (this is your "originating stitch"). Insert hook from back to front through both loops of first edging sl st made, pull yarn tail all the way through. Insert hook from back to front through originating stitch, pull yarn tail all the way through. Insert hook from WS to RS through top loops of sc behind originating stitch, pull yarn tail all the way through. Weave in ends.
Now you're ready to wash some dishes!
~ ~ ~
If you have any questions, or find mistakes in the pattern, please feel free to comment below, or contact me on Ravelry where I'm MrsMicawber.
Thanks for viewing, and happy crocheting!
~ ~ ~ ~ ~ ~ ~ ~ ~ ~ ~ ~


