

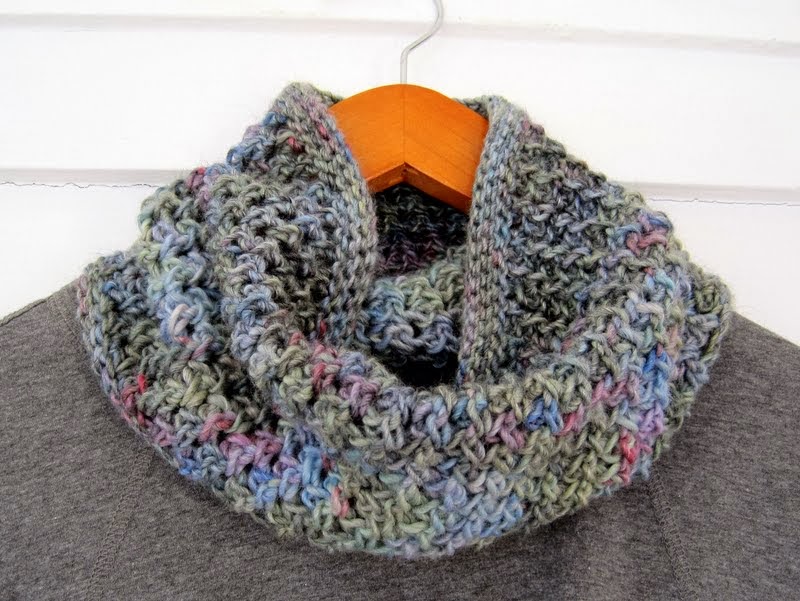
Last year, for my birthday, my sister gave me a bagful of lovely yarns. Among them was a skein of Colinette Art - a beautifully soft wool-bamboo blend, with muted sparks of blue and rose and lilac shining out from a wintry grey-green base. Like northern lights, only softer ... hence the name Northern Shadows.
Such a beautiful yarn calls for a simple stitch pattern that will highlight it, not compete with it:

I call this stitch pattern Floating Single Crochet Clusters. Inspired by the technique used for Solomon's Knots, each Floating SC Cluster consists of two stitches: a base sc, and a second ("floating") sc worked into the left vertical strand of the base sc.
Stitched in the round, using a large hook and gentle tension, Floating SC Clusters yield an eyeleted, waffle-weave-look fabric with lovely diagonal lines. Simple back-loop-only slip stitch rounds at either edge complement the diagonal texture and give a neat finish.

Floating SC Clusters can also be worked flat, in back and forth rows, for a different look:

I think the spiral rounds look nicer. :)
~
The Northern Shadows cowl is a very quick make - I finished mine in just 2-3 hours.
Size: 7" x 22" (easily customised - see Notes below)
Yarn Requirements: approximately 125 yards worsted weight yarn
(Pattern will also work with any weight yarn and an appropriate size hook)
Gauge: 7 clusters and 11 rows = 4" in pattern stitch
Yarn I Used: Colinette Art, colour Monet
How Did the Yarn Behave? Wonderfully. Colinette Art is a soft and smooth Z-twist yarn that glides easily over the hook. It stands up well to repeated frogging (very handy for those of us who can never make up our minds just how big we want our cowls to be). The finished fabric is light, warm, and very comfortable.
Hook Size: US K/6.5 mm, or hook that gives desired fabric characteristics. Choose a larger hook than recommended on yarn label.
Notions: Darning needle; stitch marker (optional)
All crochet terminology is American.
Abbreviations/Special Terms Used:
Sc - single crochet
Base sc
Floating sc
Floating Sc Cluster
Yo - yarn over
Notes:
- Cowl size can be easily adjusted by increasing or decreasing the starting chain.
- Keep your tension gentle for best results.
- Each Cluster is made up of 2 stitches: a base sc and a floating sc.
- Base scs will have looser tension than floating scs (this is as it should be).
- When working in a continuous spiral, new clusters are always worked in a base sc from the previous round. (Floating scs are always skipped.)
- Video tutorial and phototutorial on Floating Sc Clusters can be found below.
Northern Shadows Cowl Pattern in (mostly) Plain English
Leaving a 6" tail, loosely chain 76 (or any even number).
Starting Edging:
Row 1: Turn; starting in 2nd chain from hook, slip stitch 75 in back loops only. Do not turn.
Row 1: Turn; starting in 2nd chain from hook, slip stitch 75 in back loops only. Do not turn.
Round 2: Bring ends together, being careful not to twist chain; slip stitch 75 in back loops only to form a ring. Place marker if desired to mark first stitch. Cowl will be worked in the round from here on.
Round 3: Continuing in spiral round, slip stitch 75 in back loops only; slip stitch in both top strands of next stitch; chain 1, turn. (Reverse side of edging will show on the right side of cowl.)
Body:
Round 4 (RS): Start pattern stitch. Insert hook in next stitch, draw up a loop, grasp working yarn near base of loops, yo and draw through both loops while still holding strand (base sc made); insert hook between yarn strand and rest of sc, draw up a loop, let go of strand, yo and draw through both loops on hook (floating sc made); first Floating Sc Cluster made. *Skip 1 stitch, make Floating SC Cluster in next stitch. Rep from * around = 38 clusters. Do not turn.
Round 4 (RS): Start pattern stitch. Insert hook in next stitch, draw up a loop, grasp working yarn near base of loops, yo and draw through both loops while still holding strand (base sc made); insert hook between yarn strand and rest of sc, draw up a loop, let go of strand, yo and draw through both loops on hook (floating sc made); first Floating Sc Cluster made. *Skip 1 stitch, make Floating SC Cluster in next stitch. Rep from * around = 38 clusters. Do not turn.
Rounds 5-19: Starting in first base sc from previous round, make Floating Sc Cluster. *Skip 1 stitch, make Floating Sc Cluster in next stitch. Rep from * around, working in continuous spiral rounds, to equal 16 pattern rounds (or to desired height of cowl). On final pattern round, replace final Cluster with plain sc; sk 1, sl st in next base sc, ch 1, turn.
Ending Edging:
Rounds 1-4 (WS): Slip stitch 75 in back loop only. Do not turn. Work 3 more continuous rounds of back loop only slip stitch; cut yarn and invisible join to next stitch.
Rounds 1-4 (WS): Slip stitch 75 in back loop only. Do not turn. Work 3 more continuous rounds of back loop only slip stitch; cut yarn and invisible join to next stitch.
With starting yarn tail, close the small gap in the starting edge. Weave in yarn ends. Block if desired.
Video Tutorial for Floating Single Crochet Clusters
Photo Tips for Cowl and Floating Sc Clusters
For the starting edge, chain 76, or any even number (the last chain is the turning chain):

Turn, and slip stitch in the back loop only to other end of chain. This will give you an odd number of stitches.

Bring ends together, without twisting work, and continue to slip stitch in the back loop only for 2 more rounds.


Slip stitch in both strands of next stitch.
Now you're ready to start the pattern stitch.
Chain 1, TURN. Insert hook in the next stitch, and follow the photos to make your Floating Sc Clusters:


That's it! You've made a Floating Single Crochet cluster. Pretty simple, isn't it?
Remember to keep a very gentle tension as you work this stitch pattern. It's okay if your base scs are a little loose - the stitches will even themselves up as you work.
Skip 1 stitch, and make another Floating Sc Cluster in the next stitch.

When you have worked all the way around, do not turn. Just keep making new Floating Sc Clusters on top of the old ones, working in spiral rounds. Don't forget to skip a stitch between clusters.

You can use a stitch marker if you like at the beginning of each round, or you can just follow the diagonal cluster lines to see where your rounds start and end.

Work in spiral rounds until your cowl is as tall as you like.
On the final round, replace the last Cluster with a plain single crochet.
On the final round, replace the last Cluster with a plain single crochet.
Then skip 1, and slip stitch in the next base sc.
Chain 1, TURN.

Chain 1, TURN.
For the ending edge, make 4 continuous rounds of back loop only slip stitch, working with the wrong side facing. (The wrong side of the slip stitch rounds will show on the right side of the cowl.) Remember to keep a gentle tension.
When you finish the final round of slip stitch, cut yarn and join with an invisible join (click for tutorial). That's it!
When you finish the final round of slip stitch, cut yarn and join with an invisible join (click for tutorial). That's it!
With the starting yarn tail, sew the little gap in the starting edge closed. Weave in both yarn tails and block if desired.
You can do whatever you like with the items you make from this pattern, but you may not sell the pattern or reproduce the text without permission. (Links to this post are welcome.) If you do make these cowls for sale, please credit the designer. :)
If you have any questions about this pattern, ask away in the comments box below, or contact me in Ravelry.
Thanks for viewing, and happy crocheting!

~ ~ ~ ~ ~ ~ ~ ~ ~ ~ ~ ~
Great pattern! I like the fabric the stitch makes and agree that it looks so good in the round to forming the diagonals. Pretty yarns too, both of them. As a co plete aside, I've always wanted to see the northern lights, it must be amazing! Happy weekend! Fx
ReplyDeleteIt's gorgeous, I love the colours you will be able to match it with so many things. Thank you for the great tutorial another project for my to do list. :)
ReplyDeleteOh so very pretty.. I always learn so much by reading your blog...thank you for taking the time to make the tutorial...you rock! :)
ReplyDeleteWith the exception of three days this last week, we do not have much need for cowl neck scarves here in Louisiana. Think I will try your stitch design on some kitchen dish cloths. I always need those, unfortunately ;( Linda@Wetcreek Blog
ReplyDeleteBeautiful cowl! Thanks for the tutorial on the stitch! I love how it works up! Using it right now... :)
ReplyDeleteAnother very cool stitch. It creates such amazing texture. It actually seems like one I could do. And your cowl is beautiful in pattern and color. Thank you for sharing the pattern.
ReplyDeleteYou are so clever at this Sue, love your yarn and your cowl looks superbly snug. Thanks for your generosity at sharing this pattern and I hope you are keeping cosy as we enter February xxx
ReplyDeleteThis is beautiful-- so happy to see you back, Sue. Perfect for cold Illinois weather we've been having here.
ReplyDeleteI just saw the first picture and I was like, "Wow, she's doing knitting patterns now!" This looks a lot like a eyelet pattern. As always, this is such a great tutorial I will try this soon. :)
ReplyDeleteFantastic, it's lovely yarn and such a beautiful texture. Love it.
ReplyDeleteThanks very much for this pattern. I really love that Northern Lights yarn, it reminds me of the colors from Monet's Water lilies painting, truly lovely colors.
ReplyDeleteabsolutely a perfect match of stitch and yarn.. GORGEOUS
ReplyDeleteGorgeous cowl Sue, I love the look of this stitch and would like to give it a try some time soon. Thanks so much for putting so much into your lovely posts, you are always so helpful and encouraging! Hugs, Joy x
ReplyDeleteWow, that is beautiful, yarn AND pattern! Good job! Everyone has a cowl it seems nowadays, I guess I need to make one someday soon. ((hugs)), Teresa :-)
ReplyDeleteWow it's stunning! I am really liking gray lately. Your tutorial is so good. :-) Thank you, for the time and energy you put into teaching us new stitches.
ReplyDeleteSoooooo perfectly beautiful, Sue! Thanks for all your hard work and so generously and expertly sharing your pattern. xx
ReplyDeleteLove this...I'm inspired!. I am only a "sometime crocheter" so this would be a great small project for me :) Have a lovely Sunday!
ReplyDeleteYour cowl is beautiful. Thank you for the pattern!
ReplyDeletethankyou great tutorial and lovely cowel willl surely make this.xjoyce
ReplyDeleteYour cowl is SO LOVELY, Sue! I have to try that stitch, which looks so soft and elegant. Thanks for sharing :-)
ReplyDeleteWow, this Loop is wonderful. Thank you for the pattern.!
ReplyDeleteGerlinde
I, too, just love Colinette. Perfect present! The colors are heavenly and suit the name so well. This is a gorgeous stitch, and as you've noted, it doesn't compete with the yarn, but harmonizes with it so beautifully!
ReplyDeleteThis is the perfect size pattern for a "free" skein of yarn that has no coordinating or matching colors in the same weight! The skein is 130 yards so now I can use it!! Thanks.
ReplyDelete