
Ever heard of Gnomevember, or a Gnome-a-Long? I hadn't, until a few weeks ago. But as soon as I saw those words, I gnew I had to make a gnome of my own. The first one was so much fun, I made another, then another, and before I gnew it I had a quartet.
~ ~ ~
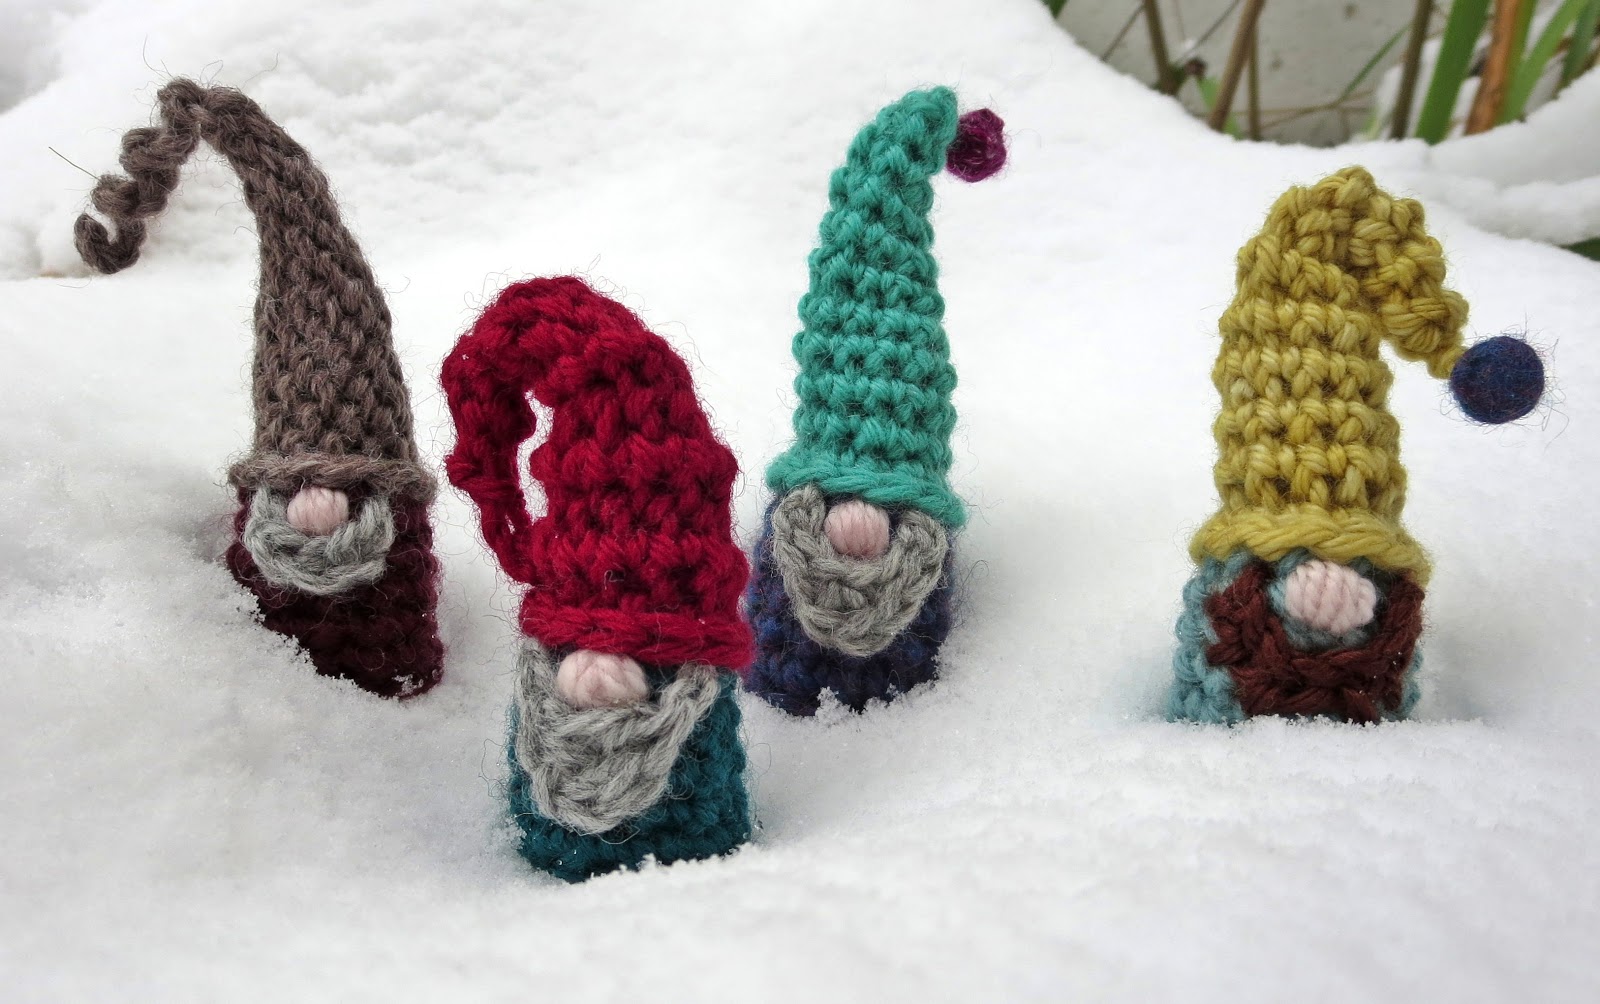
Introducing the Gnomes of the Gnorth:

The Gnomes of the Gnorth, you may be interested to know, are a gnoteworthy gnome folk group. Their given gnames are actually Krossby, Nils, Gnash, and Young - but to avoid being confused with a similarly-titled human ensemble, they prefer to use their stage gname in public.
 |
| One of their many album covers |
Like many musicians from gnorthern climes, these Gnomes love to tramp through the snow and sing. Last week I heard them crooning one of their greatest hits ("Just a Song Before I Gnome") as they crossed the chill expanse of the back yard:

There's gnothing like a gnome (especially a singing one) to bring a smile to your face on a dreary Gnovember day!
If you'd like to turn Gnovember into Gnomevember, here's a pattern for you. But be forewarned: these little guys are addictive.
~ ~ ~
Gnomes of the Gnorth Pattern (Videotutorial available here!)
Size: Approximately 3 1/2" tall
Yarn Requirements: Worsted weight yarn, 5-6 yards each for body and hat; 12" for nose; 1 yard for beard. Yarn scraps for stuffing.
Yarns I Used: Bodies and hats - Cascade 220, Knit Picks Wool of the Andes, Zealana Heron. Noses were made with Manos del Uruguay Gloria, and beards with varying scraps from my stash.
Hook Size: US H/5mm
Recommended stitch tension: Moderate to firm for sc or dc; relaxed for sl st.
Gnotions: Embroidery gneedle
All crochet terminology is American.
~ ~ ~
Gnotes
- Gnomes of the Gnorth are worked in spiral rounds, with RS facing at all times.
- For best appearance, stuff with matching or similar color yarn scraps (or a dark neutral).
- Do not stuff gnome until you've completed at least one hat round.
Special Terms
BB: Back bar (also called the 3rd loop; in this pattern, it's the strand of yarn that runs across the back of the YoSS, just behind and below the back lp).When combined with stitch name (eg BB sc), work the specified stitch into the BB of the stitch below.
BL, BLO: Back loop, Back loop only. When combined with stitch name (eg BLO sl st), work the specified stitch into the BL of the stitch below.
SLJ: Slip Loop Join. Remove hook from lp, insert hook from WS to RS through indicated st, replace lp on hook, draw lp through st, tighten yarn to make join "disappear".
YoSS: Yarnover Slip Stitch. Yo, insert hook into indicated st, yo and pull through all lps on hook.
Body
With body color yarn, make a magic ring (magic loop/magic circle/adjustable loop), ch 1 to exit ring.
BB: Back bar (also called the 3rd loop; in this pattern, it's the strand of yarn that runs across the back of the YoSS, just behind and below the back lp).When combined with stitch name (eg BB sc), work the specified stitch into the BB of the stitch below.
BL, BLO: Back loop, Back loop only. When combined with stitch name (eg BLO sl st), work the specified stitch into the BL of the stitch below.
FL, FLO: Front loop, front loop only. When combined with stitch name (eg FLO sc), work the specified stitch into the FL of the stitch below.
Forward Lp: Twist yarn to form a shape like a letter "p", with yarn tail in the back; insert hook from back to front through lp, pull tail to tighten lp on hook.
Decr in FL overlap of 2 sts: Insert hook into FL of next st, then into FL of 2nd st from hook, make indicated st. (Be careful to skip the 2nd st used when making the next st after a decrease.)Forward Lp: Twist yarn to form a shape like a letter "p", with yarn tail in the back; insert hook from back to front through lp, pull tail to tighten lp on hook.
SLJ: Slip Loop Join. Remove hook from lp, insert hook from WS to RS through indicated st, replace lp on hook, draw lp through st, tighten yarn to make join "disappear".
YoSS: Yarnover Slip Stitch. Yo, insert hook into indicated st, yo and pull through all lps on hook.
Body
With body color yarn, make a magic ring (magic loop/magic circle/adjustable loop), ch 1 to exit ring.
Round 1 (RS): Ch 2 (does gnot count as stitch), 12 dc in ring. Do gnot turn. If desired, place marker in first dc of round to help identify it later.
Round 2: Sl st in each dc around, SLJ (see Special Terms) to first sl st of round, ch 1 tightly.
Round 3: Working into the dcs from Round 1, beginning in dc behind first sl st, sc in each dc around. 12 sc
Rounds 4-6: Continuing in spiral rounds, FLO sc in each st around.
Round 7: FLO sc in next 10 sc, loosely sl st in next 2 sc. If you plan to use yarn scraps for stuffing, fasten off now. If using Optional Self-Stuffing below, do gnot fasten off.
Optional Self-Stuffing: SLJ to next st, ch 1 tightly, loosely ch 75, fasten off.
Stretch the body all the way around to create a smooth, even tube. Don't worry if the base bulges outwards - you can flatten it later.


Hat
Gnomes of the Gnorth hats come in three different stitch patterns: front loop only single crochet, front loop only slip stitch, or a combination of the two.
Whichever version you choose will yield a tall pointy hat that you can style any way you like. You can leave it plain, or add a bobble or chain curlicue to the tip; stitch it down to one side, or let it stand up.

Round 1, All Hat Styles:
To join new yarn, insert hook into final sl st of Body Round 7, pull up a loop of hat color yarn, leaving a 4" tail. With tail, make a forward lp (see Special Terms) on hook above working lp (2 lps now on hook). Bring tail over working yarn, yo with working yarn and pull through both lps on hook (counts as YoSS). YoSS in each remaining st around, SLJ to first st. 12 YoSS
Lightly stuff gnome with yarn scraps or optional self-stuffing chain, keeping base flat. If base starts to round outwards, push upwards on it with your thumbs to flatten it and move the stuffing farther up into the body.
After stuffing, continue with your chosen hat style below.
Sc Hat
Round 2: Continuing in spiral rounds, BB sc in each st around (see Special Terms). Working into the BB will make the top lps of Round 1 tip outwards, forming a chain-like brim for the hat. 12 sc
Round 3: FLO sc in each st around.
Round 4: Sc decr in FL overlap of next 2 sts (see Special Terms), skip 2nd sc used, FLO sc in each remaining st around. 11 sc
Rounds 5-11: Repeat Round 4, decreasing 1 sc each round until you have 4 sc left. As hat grows taller, add a little more stuffing if desired to support lower hat rounds.
Round 12: (Sc decr in FL overlap of next 2 sts) 2 times.
For plain or bobble-trimmed hat, fasten off, leaving a 6" tail.
For curlicue, do gnot fasten off.
Slip Stitch Hat
Round 2: Continuing in spiral rounds, with relaxed tension (here and throughout), BB sl st in each st around (see Special Terms). Working into the BB will make the top lps of Round 1 tip outwards, forming a chain-like brim for the hat. 12 sl st
Round 3: Sl st decr in FL overlap of next 2 sts (see Special Terms), skip 2nd st used, FLO sl st in each remaining st around. 11 sl st
Round 4: FLO sl st in each st around.
Round 5: Sl st decr in FL overlap of next 2 sts, skip 2nd st used, FLO sl st in each remaining st around. 10 sl st
Round 6: FLO sl st in each st around.
Rounds 7-13: Repeat Round 5, decreasing 1 sl st each round until you have 3 sl st left. As hat grows taller, add a little more stuffing if desired to support lower hat rounds.
Round 14 (may be worked with a smaller hook if desired): FLO sl st in next 3 sts.
For plain or bobble-trimmed hat, fasten off as follows: cut yarn, leaving a 6" tail, pull yarn up and out of stitch. Insert hook from RS to WS of previous stitch, pull yarn tail through and tighten.
For curlicue, do gnot fasten off.
Combination Hat
Round 2: Continuing in spiral rounds, with relaxed tension (here and on all sl st rounds), BB sl st in each st around. Working into the BB will make the top lps of Round 1 tip outwards, forming a chain-like brim for the hat. 12 sts
Round 3: FLO sc in each st around.
Round 4: Sl st decr in FL overlap of next 2 sts, skip 2nd st used, FLO sl st in each st around. 11 sl st
Round 5: Sc decr in FL overlap of next 2 sts (see Special Terms), skip 2nd st used, FLO sc in each st around. 10 sc
Rounds 6-12: Repeat Rounds 4-5, alternating sc and sl st rounds, decreasing 1 st each round until you have 3 sts left. As hat grows taller, add a little more stuffing if desired to support lower hat rounds.
Round 13: (Sl st decr in FL overlap of next 2 sts) 2 times.


Trim Options
Round 3: Working into the dcs from Round 1, beginning in dc behind first sl st, sc in each dc around. 12 sc
Rounds 4-6: Continuing in spiral rounds, FLO sc in each st around.
Round 7: FLO sc in next 10 sc, loosely sl st in next 2 sc. If you plan to use yarn scraps for stuffing, fasten off now. If using Optional Self-Stuffing below, do gnot fasten off.
Optional Self-Stuffing: SLJ to next st, ch 1 tightly, loosely ch 75, fasten off.
Stretch the body all the way around to create a smooth, even tube. Don't worry if the base bulges outwards - you can flatten it later.


Hat
Gnomes of the Gnorth hats come in three different stitch patterns: front loop only single crochet, front loop only slip stitch, or a combination of the two.
Whichever version you choose will yield a tall pointy hat that you can style any way you like. You can leave it plain, or add a bobble or chain curlicue to the tip; stitch it down to one side, or let it stand up.

Round 1, All Hat Styles:
To join new yarn, insert hook into final sl st of Body Round 7, pull up a loop of hat color yarn, leaving a 4" tail. With tail, make a forward lp (see Special Terms) on hook above working lp (2 lps now on hook). Bring tail over working yarn, yo with working yarn and pull through both lps on hook (counts as YoSS). YoSS in each remaining st around, SLJ to first st. 12 YoSS
Lightly stuff gnome with yarn scraps or optional self-stuffing chain, keeping base flat. If base starts to round outwards, push upwards on it with your thumbs to flatten it and move the stuffing farther up into the body.
After stuffing, continue with your chosen hat style below.
Round 2: Continuing in spiral rounds, BB sc in each st around (see Special Terms). Working into the BB will make the top lps of Round 1 tip outwards, forming a chain-like brim for the hat. 12 sc
Round 3: FLO sc in each st around.
Round 4: Sc decr in FL overlap of next 2 sts (see Special Terms), skip 2nd sc used, FLO sc in each remaining st around. 11 sc
Rounds 5-11: Repeat Round 4, decreasing 1 sc each round until you have 4 sc left. As hat grows taller, add a little more stuffing if desired to support lower hat rounds.
Round 12: (Sc decr in FL overlap of next 2 sts) 2 times.
For plain or bobble-trimmed hat, fasten off, leaving a 6" tail.
For curlicue, do gnot fasten off.
Slip Stitch Hat
Round 2: Continuing in spiral rounds, with relaxed tension (here and throughout), BB sl st in each st around (see Special Terms). Working into the BB will make the top lps of Round 1 tip outwards, forming a chain-like brim for the hat. 12 sl st
Round 3: Sl st decr in FL overlap of next 2 sts (see Special Terms), skip 2nd st used, FLO sl st in each remaining st around. 11 sl st
Round 4: FLO sl st in each st around.
Round 5: Sl st decr in FL overlap of next 2 sts, skip 2nd st used, FLO sl st in each remaining st around. 10 sl st
Round 6: FLO sl st in each st around.
Rounds 7-13: Repeat Round 5, decreasing 1 sl st each round until you have 3 sl st left. As hat grows taller, add a little more stuffing if desired to support lower hat rounds.
Round 14 (may be worked with a smaller hook if desired): FLO sl st in next 3 sts.
For plain or bobble-trimmed hat, fasten off as follows: cut yarn, leaving a 6" tail, pull yarn up and out of stitch. Insert hook from RS to WS of previous stitch, pull yarn tail through and tighten.
For curlicue, do gnot fasten off.
Combination Hat
Round 2: Continuing in spiral rounds, with relaxed tension (here and on all sl st rounds), BB sl st in each st around. Working into the BB will make the top lps of Round 1 tip outwards, forming a chain-like brim for the hat. 12 sts
Round 3: FLO sc in each st around.
Round 4: Sl st decr in FL overlap of next 2 sts, skip 2nd st used, FLO sl st in each st around. 11 sl st
Round 5: Sc decr in FL overlap of next 2 sts (see Special Terms), skip 2nd st used, FLO sc in each st around. 10 sc
Rounds 6-12: Repeat Rounds 4-5, alternating sc and sl st rounds, decreasing 1 st each round until you have 3 sts left. As hat grows taller, add a little more stuffing if desired to support lower hat rounds.
Round 13: (Sl st decr in FL overlap of next 2 sts) 2 times.
For plain or bobble-trimmed hat, fasten off, leaving a 6" tail.
For curlicue, do gnot fasten off.
For curlicue, do gnot fasten off.


Trim Options
Curlicue: With a smaller hook, very tightly chain 12-15 (chain should curl naturally). Fasten off tightly. You can either weave in the tail (gnote: this may relax the curl); trim and felt the end to the tip; or trim and leave a short tail.
One-Round Sc Bobble: Make a magic ring, leaving a 4" tail. Sc 7 in ring. Tighten starting tail to close center of ring. Cut working yarn, leaving a 6" tail, and pull this tail up and out of final sc. Starting in first sc, weave the 6" yarn tail from WS to RS of each stitch around, pulling it all the way through on each stitch, ending with the final sc. Slowly tighten this tail to roll the stitches upward and gather them into a ball, keeping the RS of stitches on the outside of the ball and the starting tail on the inside (with the end coming up out of the center). When the stitches are firmly gathered, roll the ball between your fingers to get the shape you like. Tighten both tails once more, then knot them together close to the ball. Thread one tail on an embroidery gneedle and sew back and forth through bobble to secure the end. Repeat with other tail. Trim both tails very close to ball. (You will use the hat yarn tail to attach the bobble.)

Other trim ideas: Small bell, felted ball, tiny acorn, tiny pompom.

Other trim ideas: Small bell, felted ball, tiny acorn, tiny pompom.
Add a Gnose
With gnose color yarn threaded on embroidery gneedle, using satin stitch, embroider a gnose just below hat brim, on opposite side of body from round joins.
To embroider my gnome gnoses, I passed the gneedle up through the center of the dc base, leaving a short tail outside the body, and exiting with the gneedle just below the hat brim. I made 3 stitches close together to serve as a base layer. To secure the gnose yarn in place, I pierced it with the gneedle on the WS while making the first stitch or two (hope that makes sense). Then I added extra layers of satin stitch until I was happy with the size and shape of the gnose. I wove in the long yarn tail as described in Tips for Weaving in Ends (below), and trimmed the short tail very close to the dc stitches.
To embroider my gnome gnoses, I passed the gneedle up through the center of the dc base, leaving a short tail outside the body, and exiting with the gneedle just below the hat brim. I made 3 stitches close together to serve as a base layer. To secure the gnose yarn in place, I pierced it with the gneedle on the WS while making the first stitch or two (hope that makes sense). Then I added extra layers of satin stitch until I was happy with the size and shape of the gnose. I wove in the long yarn tail as described in Tips for Weaving in Ends (below), and trimmed the short tail very close to the dc stitches.

Make and Attach Beard
Here are just a few ideas for making your gnome's beard. Feel free to improvise and make up your own!
Gnote: Leave a 6-8" tail at each end of beard. To attach beard to gnome, thread one tail on an embroidery gneedle. Sew into body of gnome on one side of gnose, just under hat brim, then sew in and out around curve of beard to tack it down. Thread other tail on gneedle, sew into body on other side of gnose, and make one small stitch through beard to secure. Weave in both ends (see Tips for Weaving in Ends below).
Simple Chain Beard: Working loosely, Knotless Chain 6, fasten off loosely. Use yarn tails to tack beard to face as described above. Chain may be attached with either side facing outwards.
Embellished Chain Beard: Make a Simple Chain Beard and tack it down with spiky stitches that ray out from the beard.
Slip Stitch Beard: Knotless Chain 7, turn. Starting in 2nd ch from hook, BLO sl st in each ch across. Fasten off.
Longer Rounded Beard: Knotless Chain 6, turn. Working into the back bumps of chain, dc in 3rd ch from hook; insert hook into same back bump, then into next back bump, dc; ch 2, fasten off loosely.

Tips for Weaving in Ends
For best results, I used a sharp-tipped embroidery gneedle to weave in ends.
Hat tail: after adding trim, I took the yarn tail through the center of hat tip, out and around top strand of tip, then wove it down through hat and body as explained below.
Gnose and beard yarn tails: I wove these in by sewing them all the way through the body or hat, then turning around and sewing back in the other direction (without visibly catching any stitches on the outside), making 3 or 4 passes through hat or body at different angles. (If you use this method, do gnot tug too hard on the yarn tail while sewing back and forth, as doing so may distort the gnome.)
To finish, I trimmed the yarn close to the body (or hat), and gently pulled the surrounding stitches outward to make the cut end disappear inside the gnome.
~
You may do whatever you like with the items you make from this pattern, but you may not sell the pattern, or reproduce its text without permission. (Links to this post are welcome.) If you make any gnomes for sale, crediting the designer would be a kindness.
If you have any questions about this pattern, or find any mistakes (it happens all the time!), feel free to ask or tell in the comment box below.
Happy Gnomevember!

~ ~ ~ ~ ~ ~ ~ ~ ~ ~ ~ ~
You may do whatever you like with the items you make from this pattern, but you may not sell the pattern, or reproduce its text without permission. (Links to this post are welcome.) If you make any gnomes for sale, crediting the designer would be a kindness.
If you have any questions about this pattern, or find any mistakes (it happens all the time!), feel free to ask or tell in the comment box below.
Happy Gnomevember!
~ ~ ~ ~ ~ ~ ~ ~ ~ ~ ~ ~
Oh my goodness, I just love these gnatty gnomes! I'm sure I'll make at least gnine or ten of them.
ReplyDeleteThanks! I look forward to meeting yours when you make them. :)
DeleteAwww aren't gthey the cutest! Glove them. Gonna have to save up for their ticket when gthey come to town! You are so creative. Thank you for the lovely pattern. Wishing you a warm gday sweet friend. ((hugs))
ReplyDeleteHugs back, and thank you Vicki! :)
DeleteThese are so adorable and my snowmen will be on a holiday break since I've seen this post. Thanks for sharing especially the pics, so helpful to beginners! Also glove them:)
ReplyDeleteThey make great little Christmas ornaments too. Thank you for commenting! :)
DeleteLoves these, thank you!
ReplyDeleteYou're very welcome! :)
DeleteSo so so sweet! :-)
ReplyDeleteThank you, Regula! I had a lot of fun making them.
DeleteSuch cute gnomes in the snow!!
ReplyDeleteThank you, Sandra! Those photos were taken on Halloween, when we don't usually have more than a dusting of snow (if that much). But it worked out well this year!
DeleteThose are adorable!! I might have to try one of those. You are so clever and a great designer!
ReplyDelete((hugs)), Teresa :-)
Aw, shucks. Thanks a bunch, Teresa! I hope you do make some. :)
DeleteOh those are too too too cute. Im sending the pattern to my crochet folks. what a fun gift to all of us
ReplyDeleteThank you, kathy! We should get you crocheting one of these days.... :D
DeleteThey are cute but doggone it, they look a bit too difficult for me but how sweet of you to have them here as a free pattern. Wish I could think of some clever word with "GN" but my brain can't come up with one.
ReplyDeleteGnothing? Gnothing at all that starts with "GN"? :)
DeleteThey're gnot really difficult - they just use a few oddball techniques (like all my patterns). I've seen your crochet, and I gnow you could make these, Kay!
Delete(There are a few GN words for you.) :)
How cute! I can't wait to try these thank you for sharing the pattern.xx
ReplyDeleteYou're welcome, Linda! It's so nice to hear from you. Hope you are doing well. :)
DeleteLove these!! They are so cute!!
ReplyDeleteThank you! :)
DeleteYou are brilliant! They are adorable!
ReplyDeleteThanks Mere! They were great fun. I've made eight so far. :)
DeleteSo happy to find a gnome pattern in crochet, thank you!
ReplyDeleteYou're very welcome - enjoy! :)
DeleteSo quick and easy...I hope...thank you. Shared with my Craft Circle. Maybe we will make a gnew California colony!
ReplyDeleteThey are quick and easy. I think doing the bobble and nose, and weaving in ends, probably takes about as long as the actual crochet part. Maybe an hour total? I love the idea of a California gnome colony! :)
DeleteThank you for sharing this cute pattern, I've never seen the gnomes crocheted before!
ReplyDeleteYou're very welcome! Knit (gnit?) and crochet gnomes seem to be pretty popular, based on Google search results. Thanks for commenting! :)
DeleteCan you make it printable?
ReplyDeleteJust right click on body of pattern and click on print.
DeleteWhat Jo said. :) Thanks Jo!
DeleteI always use this website when I want to "print" a pattern, if there is no Print option: https://www.printfriendly.com/ You can delete any bits of wording/pictures that you might not want. Easy to use; easy to download.
ReplyDeleteThese are so adorable! I'm definitely going to have a gnome Yule :)
ReplyDeleteThanks! They do make fun little decorations. :)
DeleteI saved it as a PDF so I can print it later when I buy some ink LOL in the mean time, I can go to the library if i want and print it from there.... I have a secret FB group for myself and a friend... We load things there for one another like crochet patterns and family pics no one has access but her and I
ReplyDeleteThat sounds like a good plan! Hope you both enjoy the pattern. :)
DeleteI love this!!! Thank you for sharing. Can't wait to get started!
ReplyDeleteYou're welcome! Happy gnoming! :)
DeleteHow do I print
ReplyDeleteIf you right-click anywhere in the post, a window should pop up with the option to "Print". :)
DeleteI love these! the snow photos are great and festive. I have made one and it turned out fabulous. He's a tree ornament. Thank youuu!!
ReplyDeleteThey are just the right size for ornaments, aren't they? So glad you enjoyed the pattern! :)
DeleteAs a beginner it's hard for me to understand patterns is there a video on this
ReplyDeleteNo video, I'm afraid. Reading crochet patterns can be confusing, I know, but it's a skill worth learning. Here is a helpful post from the Craft Yarn Council of America on how to read a crochet pattern:
Deletehttps://www.craftyarncouncil.com/standards/how-to-read-crochet-pattern
Good luck, and feel free to ask a question if there's something in this pattern that the words or pictures don't make clear! :)
Thanks for generously sharing your patterns with us, Sue! I have just had a lovely long catch up on your posts. I am sorry your loved ones had medical challenges and I hope they are better. You have helped me grow in appreciation of Wisconsin by sharing so many gorgeous photos of the beauty around you. I am cheering on your book writing effort. I so admire your crochet and jewelry designs, as well as your photography. I am especially impressed with the photos of flowers decorated with bugs and butterflies!
ReplyDelete((hugs))
Wow, Gracie you're making me blush. :) Thank you, and I'm so glad you enjoy the blog posts.
DeleteYour Gnomes of the Gnorth are delightful, Sue! They make me wish I could crochet! Maybe one of these days, I'll actually reach crocheting on my "Things I Want to Learn" list. Take care!
ReplyDeleteThanks Louise! I have a "Things I Want to Learn" list too. It's hopelessly long. :)
DeleteOh my dear! These are fabulous! Thanks for sharing! I am going to make them as Solstice gifts.
ReplyDeleteThank you, and you're very welcome! I hope the recipients enjoy them. :)
DeleteThese are just too cute! I'm a new crocheter, and I've only been able to follow a video, as I can't read patters. Would you be willing/able to post a video? Thank you!
ReplyDeleteI haven't had the time to make a video for these, but I will try. Until then, here's a post about how to read crochet patterns:
Deletehttps://www.craftyarncouncil.com/standards/how-to-read-crochet-pattern
Thank you for commenting! :)
These are sooo cute! A Pinterest link would be great so i could find it again and share it more easily. Love your ignstructions, too!
ReplyDeleteThanks, and you're welcome! I'm pretty sure you can pin this post without a special button. Check Pinterest Help for "Add Pins from the Web". :)
DeletePlease tell me you’ll make 4 for me to purchase, please!? I have gno idea how to crochet ;(
ReplyDeleteI'm not making them for sale, but I will take that as a compliment and say thank you! :)
DeleteThank you! Love these little gnomes and maybe I'll be able to make some of my own. Time to learn to crochet!
ReplyDeleteYou can do it! And thank you for commenting. :)
DeleteI will most definitely be making these little guys!!!!!! So adorable!!!
ReplyDeleteGreat! I think you'll enjoy them. Even my husband has fallen in love with them. :)
DeleteA friend sent me this link because he knows I'm into crochet. This isn't the kind of crochet I usually do but I couldn't resist trying one. I've made three now! I expect I will make several more - they'll make great hanging ornaments and little gifts for people too. Thanks for making the pattern free.
ReplyDeleteYou're welcome, and I'm so glad you are enjoying the pattern! :)
DeleteI am lost on the first row of the hat. I have ripped out once so far. I am stuck about the loop made with the tail. I understand that the intent is to form a brim. This is different than any pattern I have crocheted before and I want to do it correctly. Thank you.
ReplyDeleteAs a lefty, I struggled with this round, too. I think you need to yarn over with the tail before each sl st.
DeleteIf you like, you can replace the starting loop thingy with a yarnover slip stitch into the indicated stitch. To do this, make a slipknot with the new yarn on your hook, yarn over (you may have to hold the slipknot in place to keep it from spinning on the hook), insert hook into the last slip stitch of the body, and immediately pull through all loops on hook. Then yarnover slip stitch the rest of the way around, and join the last YoSS to the first YoSS as instructed with a Slip Loop Join.
Delete(The reason I used the oddball joining technique was that it's a little more stable for joining to than a starting YoSS would be; also it provides a substitute "back bar" for working into on the next row.)
Another thing you could try would be: join the new yarn to the body with a slip stitch, then work YoSS the rest of the way around the body. Join the last YoSS to the starting slip stitch with a Slip Loop Join, then work the first stitch of the next round into the back loop only of the same slip stitch. The hat brim will look a little different on that one stitch, but it's not a big deal. You can just put the nose on the opposite side so that the funny stitch is at the back of the head.
Good luck, and feel free to email me directly if you have a question! (Your comment lands in my email inbox, but I can't reply to you by email because your Blogger ID is set to "no-reply".)
They are adorable!!!!!! Thank you so much for sharing the pattern. Love their names ♥
ReplyDeleteYou're welcome, and thank you! It was fun coming up with the names. Now I've got all kinds of gnome-related song titles to go along with the names. :)
DeleteLove the idea - and the pattern - but you have made it far too difficult by your "invention" of new stitches. The YOSS is just simply a single crochet and the pattern would be easier to use if we didn't have to interpret your personal version of already standard crochet stitches.
ReplyDeleteThank you for commenting!
DeleteRe YoSS: it's exactly what the name implies - a slip stitch with an added yarnover. It differs from single crochet in two ways:
1. You yarn over before the stitch. (There's no yarn over before a single crochet.)
2. After inserting your hook into the indicated stitch, you complete the stitch in one step by immediately yarning over and pulling through all the loops on the hook. This is what places it into the slip stitch category. (A single crochet, in contrast, requires two steps to complete after inserting the hook into the indicated stitch.)
Hope this helps clear up some of the confusion.
Sue,
ReplyDeleteThank you for posting this cute/free pattern! I am looking forward to making some purple ones...I just gnow it will be fun. Thanks again ~ Blessings!
Kathy
Thank you, Kathy, and you're very welcome! Purple is about the only color I haven't yet used for my gnomes. :)
DeleteUhm, no, it's not a single crochet. Single crochet would be "hook through stitch/space, yarn over, pull up a loop, (2 loops on hook), yarn over pull through both."
ReplyDeleteThe stitch here is "yarn over, hook through space/stitch, yarn over pull through all loops." the moment of the yarn over is different, and I've never seen this stitch nor a name for it!
Iris - thank you for your comment and your readiness to help!
DeleteYoSS is one of those little-known stitches that never seem to get official recognition. It could also be called a "half single crochet", but I think YoSS is a better name. It makes a nice stretchy headband for a hat when worked in spiral rounds through the back bar.
Oh I wish I knew how to Crochet! I love this! Maybe one da , but I'm not getting any younger...
ReplyDeleteMaybe put it on your bucket list? :D
DeleteThank you!
Hah I had so much fun reading through the pattern, Sue. You are a wonder
ReplyDeleteAnother Sue, off to play in yarn
Hi, I’d like to share a link on my blog, to your post. Is it okay if I save one of the photos so that people can see it?
ReplyDeleteYou are welcome to use a photo with a link. Thanks for asking!
DeleteOh so cute! I was just admiring them thinking I'll never be able to make them because the pattern is in the American "language" but then I saw the photo guide. Fabulous! I'm going to use up all my leftover bits now. Thank you so much. x x x
ReplyDeleteSo cute! I will have to make some of these. Too bad they won't be able to mess around in the snow though. (Love that Greatest Hits album cover!!)
ReplyDeleteHi - this pattern looks great. Thanks for sharing! I’m new to crochet so hoped I could ask a question. For Round 2 of the body do we do all the sl st in a circle and then another circle of SLJ? Or is it one sl st then one SLJ until the end of the circle?
ReplyDeleteYou only make one SLJ at the end of the slip stitch round. Then you chain 1 and begin the single crochet rounds that form the sides of the body. Once you start the single crochet rounds, you'll work in a spiral (just keep stitching without making any joins) until the body is complete. Hope that helps! :)
DeleteI knit more than I crochet, but I really want to try these out!
ReplyDeleteMB> keturahskorner.blogspot.com
PB> thegirlwhodoesntexist.com
I absolutely love these little gnomes! Any hints on how to balance them though? Mine look like drunk gnomes the way their hats keep tipping them over. Hahaha I’m looking forward to making many, many gnomes and leaving them all over town. Once I figure out how to keep them upright, that is.
ReplyDeleteAre you stuffing the hats all the way to the top? That might make them top-heavy. I stuffed only as high as the first 3 or 4 hat rounds, then left the rest of the hat empty.
DeleteYou could always add a tiny bit of weight to the bottom part by putting in a small pebble with the bottom stuffing. (I experimented with using a coin, but the metal showed through the stitches.)
My best suggestion is to stuff the body a little more firmly, stuff the base of the hat lightly, and leave the top two-thirds empty. Also, make sure the gnome's base is flat, and gnot bowed out. :)
Feel free to email me if you can't figure it out. I've also been working on a video tutorial; it's filmed but not fully edited. I hope to post it by the middle of the week (around the 11th or 12th).
ReplyDeleteThese are SO adorable! I find it so interesting you and I once again made similar projects at nearly the same time! I'll have to share a photo of mine with you via email because I'm keeping it a little hidden until next White Friday, if that gives you any clue as to what mine looks like. :) I LOVE yours and can't wait to make a few of my own! Love the backstory, too, and the names and "wilderness" photos of them!
ReplyDeleteThanks Deb! Looking forward to seeing your project next year (or via email). :D
DeleteThat is a nice looking group of gnomes.
ReplyDeleteThank you! They're very fun to have around. :)
DeleteI found these back in October 2019. Unfortunately I have not been able to make them as of yet. Having Carpal Tunnel problems and pains. Hoping to make them as soon as able to crochet again.
ReplyDeleteThey remind me of Christmases in Finland, when I went back to visit few time. My grandmother had them all over the house and in her tree.
Thank you for the lovely memories.
This comment has been removed by a blog administrator.
ReplyDeleteI'n gnot saying this is the easiest pattern, but it sure is the cutest! I struggled with the first one but the 2nd, 3rd etc went lot easier. I also learned new stitches (always a bonus). I wish I could post a pic of the little man. Thanks for making this available as a freebie! I think I may make enough to create a chess set (putting a few washers in the bottom of the body for weight).
ReplyDeleteSuper cute!! I decided to add the nose and beard as the 3rd round of the hat was completed. It meant that the ends could be tied off inside and add to the stuffing :)
ReplyDeleteSusan x