
Today we're going to take a look at what I call the Knotless Standing Single Crochet. This handy stitch, which first appeared in the Marigold Hat, has become part of my standard crochet repertoire. It's easy to do, and has many practical advantages:
- It's perfect for starting a new colour in rounds or at the edge of flat striped rows*
- No lumpy knot
- It's inconspicuous - looks exactly like a regular single crochet
- Can also be used as the starting stitch for a round of taller stitches (such as half-double crochets or double crochets), where the round will be closed with a slip stitch or invisible join
How to make a Knotless Standing Single Crochet:
1. Wrap yarn end from front to back of hook (from right to left, if you're right-handed; in the opposite direction if you're left-handed).
Bring the free end over the working yarn and down along the hook. (Hold the crossed-over bit with your thumb and forefinger.)

2. Keeping the working yarn to the right of the hook (or to the left if you're a lefty), insert hook in desired stitch. (The crossed-over bit, and your thumb and finger holding it, will rotate down as you do this.)

3. Yarn over, pull up a loop, and let the yarn tail pop free.

4. Lift the yarn tail over and to the left (or in the direction you will be stitching). Keep the tail between the hook and the working yarn.

5. Yarn over, and pull through both loops on hook. Done!

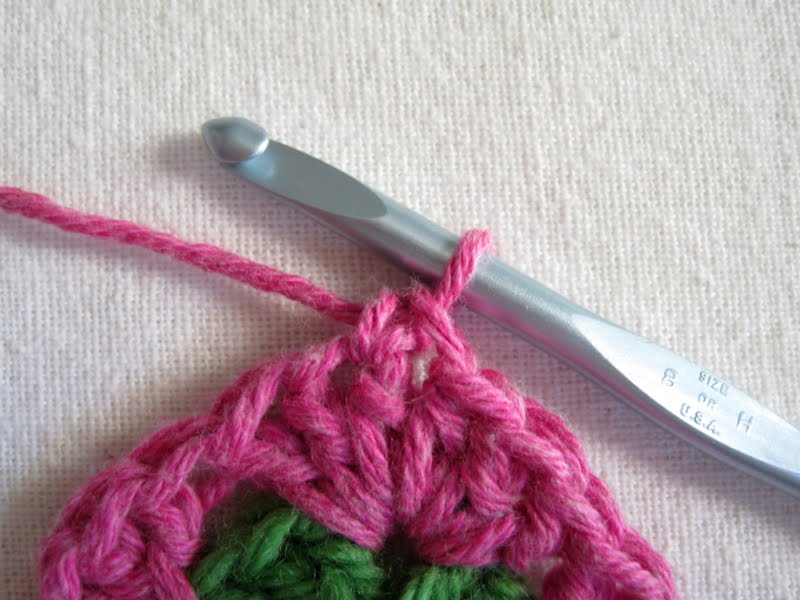
Let's see how the Knotless Standing Single Crochet, or KSSc, works as a starting stitch for a round of taller stitches. Here I've made 2 double crochets in the same space as the KSSc:

In the next photo, I've finished the round. My final double crochet is tucked up next to the KSSc, and I'm ready to close the round.

(At this point you may be wondering: Why start the round with a stitch that's shorter than the others? Answer: Having a shorter starting stitch allows you to jump right over it and close the round by attaching to the next stitch, thus preserving the stitch count and avoiding a lumpy bulge.)
If the motif were complete, or if I were about to change colours, I'd cut my yarn at this point, and make an Invisible Join in the top of the first double crochet, skipping over the KSSc.
But my pattern (which, by the way, will be posted on Friday) calls for closing the round with a single crochet. So, still skipping over the KSSc, I make a single crochet in the top of the first double crochet - and my round is complete, with a neat, tidy, nearly invisible ending. (Check back on Friday to see what happens next.)
So there you have it - a simple, smooth, easy way to start a new round of colour (or a new colour row of flat single crochet) with a stitch that can melt perfectly into the stitches around it.
~
*What if you want a taller knotless standing stitch for starting striped rows in the flat? Is it possible to do this with a half-double crochet, a double crochet, and even taller stitches? The short answer is yes. There are in fact several ways of making taller knotless standing stitches, depending on where you want the yarn tail to end up. I hope to address this in a future post, but here's a quick preview: you can make a Knotless Standing Half-Double Crochet in the same way as the KSSc - but start by wrapping the yarn in the opposite direction around the hook, or back to front (I don't know why, but it works better that way), and of course yarning over before you insert the hook into the desired stitch.
Thanks for viewing, and happy crocheting!
~ ~ ~ ~ ~ ~ ~ ~ ~ ~ ~ ~
Such an awesome tutorial! Thanks for the clear explanation and photos! Bravo!
ReplyDeleteYou're welcome! Thanks so much for commenting. :)
DeleteThanks so much for this....you are awesome! Great tutorial,Shari.
ReplyDeleteWow, thanks, Shari. That's a real compliment coming from such an accomplished crocheter. :)
DeleteThis is a good idea for new color connection. I do almost same, except I don't yarn over in advance. Great tutorial, I will try for my granny squares, as I am addicted to them at the moment :)
ReplyDeleteThank you! I hope it works well for you.
DeleteAnd thank you for commenting. :)
Interesting. Great tutorial. I will have to try this on my baby blanket.
ReplyDeleteHugs,
Sharon
Thanks, Sharon. Let me know how it works for you - I use it all the time now.
Delete:)
Now I might not really crochet yet, but even I can see the sense in this! I realised while reading in fact that it's not my understanding of crochet that's holding me back (apart from the darn UK versus US terminology thing) it's my hands not wanting to do things 'backwards', which crochet is to a lifelong knitter, the yarn's in the 'wrong' hand! Thanks for this Sue, you've given me an idea re. my beginner crocheter woes :D
ReplyDelete"Yet"? Do I hear a hint of learning a new craft? :)
DeleteI learned to knit in the Continental style, which makes perfect sense for a crocheter. My left hand is used to holding the yarn, and my right is used to manipulating the hook (or knitting needle) to pick up the yarn and put it where I want it.
It sounds as though you're thinking of trying left-handed crochet. Good luck, and let us know how you get on. :)
Excellent information, I appear to be a knot-a-holic, so this will be so helpful to make my crochet less knotty. Wonderful post!
ReplyDeleteHave a terrific day,
Meredith
Thanks, Mere. You too. :)
DeleteBeing *Crafting Challenged,* I can just say... Thank you for your offer to help me, with the New Blogger &*^%&& Thing!
ReplyDelete-sigh-
I knew it was coming! I just held on, by the skin of my teeth, till the last possible moment. Which, I guess, was between yesterday and today. -pout-
I just hate to be dragged-kicking-and-screaming, into anything. -more pouting-
But YES, I know... On the scale of all problems, this is teeny, tiny, teeny. :-) I know. I'm just stamping my foot and pounding my fist on the desk. And maybe, some pounding my forehead, on the desk, too. -grin-
"Auntie"
I know - I felt the same way. But I eventually got used to it, and now it's second nature. And there are a few really nice features about the new interface, once you get acclimatised. :)
DeleteYou make that look sooo easy.
ReplyDeleteWell, really it is, you know. :)
DeleteBravo. I haven't had time to do any tutorials lately, and this one is a charm. I'll probably be linking to it when I do multi-colored stuff! Thank you!
ReplyDeleteYou're very welcome, Deb. Link away! :)
DeleteMy brain is too tired to even comprehend this right now. I've made a few can covers with different colored rows but my joining is really, really bad. :/ Hope you are having a great day. Tammy
ReplyDeleteThanks, Tammy! I think if you practiced the Invisible Join you might really like the results. Hope your Thursday goes well. :)
DeleteI can't believe it's taken this long for me to find you. I just love love love your art- and you're an *awesome* teacher!
ReplyDeleteThank you! (And sorry for this very late reply.)
DeleteThank you very much and great regards from Argentina
ReplyDeleteYou're very welcome!
Delete