
I've been wanting to post this pattern since January, but life kept getting in the way. Now we're well into March, and it's nearly spring - but one thing that's certain in Wisconsin is that Winter Will Return (in fact, we woke up to 8" of new snow yesterday morning), and a scarf is always handy.
So, in the spirit of better-late-than-never, I present the:
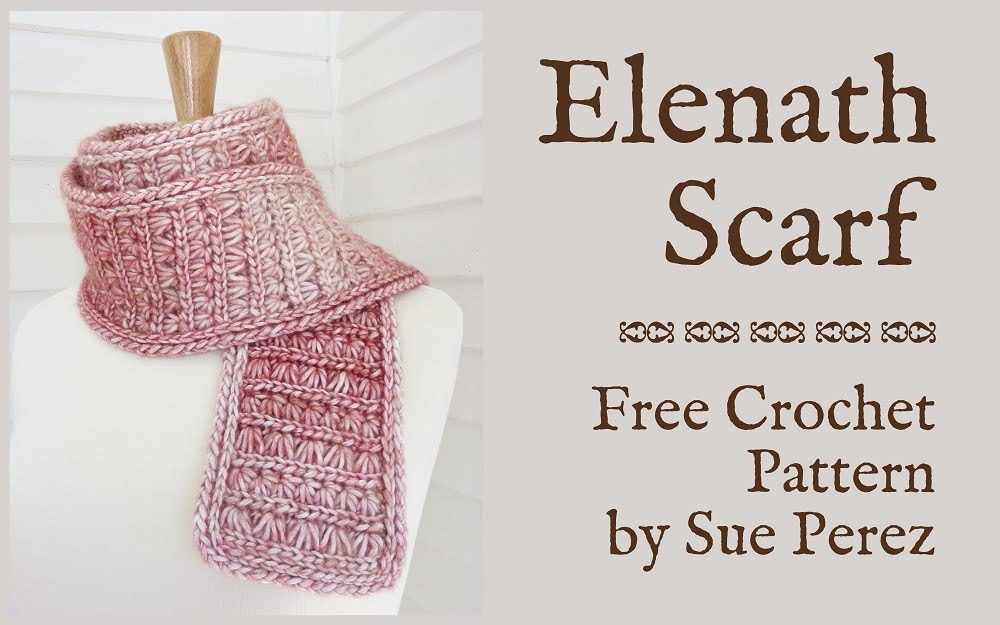
Elenath is a beautifully thick and squishy scarf featuring two kinds of star stitches, yarnover slip stitch accent rows, and a decorative edging of yarnover slip stitch and Corded Hdc. A special turning chain on the tall stitch rows gives this scarf a sturdy and straight edge, so you can omit the edging rounds if you like.
The name "Elenath" comes from the Sindarin language invented by J.R.R. Tolkien, and means "starry host" or "all the host of the stars of heaven".

~ ~ ~
Elenath Scarf Pattern in Mostly Plain English (videotutorial follows written pattern)
Sample Size: 4½" x 60" (size is easily customized)
Yarn Requirements: Worsted weight yarn, approx. 300 yards (more for a larger scarf)
Yarn I Used: Loops & Threads Natural Marl (discontinued)
Hook(s): Choose a hook size appropriate for your yarn. Optional: extra hook one or two sizes smaller for edging.
Hook Sizes I Used: US J/6mm; US H/5mm for edging
Recommended stitch tension: Relaxed for star stitches; moderate to firm for yarnover slip stitch
Notions: Yarn needle for weaving in ends
All crochet terminology is American.
~
Abbreviations and Special Terms
Note: Scarf is worked over a multiple of 6 + 4 stitches. My sample is 16 stitches wide. For a wider scarf, increase your starting chain by any multiple of 6.
Loosely chain 17, turn.
Row 1 (WS): Working into the back bumps, starting in the 2nd chain from the hook, YoSS in each of the next 15 chains, slip stitch in the next chain. (Note: if you plan to omit the edging, replace the ending slip stitch with a YoSS, here and on every YoSS row). Do not turn. 16 stitches
Tip for Row 1:
- The initial yarnover of each YoSS helps form the accent loops on the RS of the scarf. To prevent loose/floppy loops, make sure your initial yarnover is snug on the hook, close to the working loop, before inserting your hook into the stitch below.
Row 2 (RS): Make special turning chain: insert hook down through the front loop of the stitch you just made, yo and pull up a loop, yo and pull through both loops on hook (you should now have two loops sitting on the working yarn, next to the working loop on your hook); insert hook into the nearer loop, yo and pull up a loop, yo and pull through both loops on hook (you now have two new loops on the working yarn); insert hook into the farther loop, yo and pull up a loop, yo and pull through both loops on hook. Turn work clockwise (counterclockwise if you are crocheting left-handed), here and throughout.

First tall star: Yo, insert hook into back loop only of stitch that the special turning chain comes out of, yo and pull up a loop as tall as the turning chain, [insert hook into back loop only of next stitch, yo and pull up a tall loop] 3 times. Grasp working yarn with finger and thumb close to base of tall loops, yo and pull through all 6 loops on hook (a large vertical loop will form around your finger at the side of the star); remove finger from vertical loop without letting go of loop, insert hook into vertical loop space, chain 1 to catch loop (you can let go now), chain 1 more to complete star.
Remaining tall stars: [[Yo, insert hook into back loop only of the last stitch used for previous star, yo and pull up a tall loop, [insert hook into back loop only of next stitch, yo and pull up a tall loop] 3 times. Grasping working yarn close to base of tall loops, yo and pull through all 6 loops on hook, insert hook into side loop, chain 1 to catch loop, chain 1 more to complete star.]] Repeat the instructions in double brackets across, omitting the final chain-1 after completing the last star.
Ending dc: Yo, insert hook into the back loop just used and the back loop below the YoSS row, complete a dc. Special turn + 5 tall stars + ending dc = 16 stitches

Tip for Row 2:
- Each star stitch (here and on Row 4) starts with a yarnover. Be careful not to add any more yarnovers between star legs (if you do, the resulting fabric will be very stiff).
Row 3 (WS): Ch 1, turn clockwise, YoSS in the back loop only each of next 15 stitches; insert hook up through the 2 topmost WS loops of special turning chain, make a slip stitch.

Row 4 (RS): Make special turning chain (as at beginning of Row 2), turn clockwise.
First star: Yo, insert hook into middle back vertical loop of special turning chain, yo and pull up a generous loop, insert hook into bottom back vertical loop of special turning chain, yo and pull up a loop, skip the stitch the special turning chain comes out of, [insert hook into back loop only of next stitch, yarn over and pull up a loop] 3 times. Yo and pull through all 7 loops on hook, chain 1 to form eyelet and complete star.
Remaining stars: [[Yo, insert hook into eyelet of previous star, yo and pull up a loop, insert hook into farthest back vertical loop of star, yarn over and pull up a loop, insert hook into back loop only of the last stitch used for previous star, yarn over and pull up a loop, [insert hook into back loop only of next stitch, yarn over and pull up a loop] 2 times. Yarn over and pull through all 7 loops on hook, chain 1 to form eyelet and complete star.]] Repeat between double brackets across; your last star should end in the last stitch.
Make ending double crochet (as at end of Row 2), inserting hook into back loop just used and back loop below YoSS row. Special turn + 7 stars + ending dc = 16 stitches
Row 5: Repeat Row 3.
Following Rows: Repeat Rows 2-5 to desired scarf length.
Final Row (RS): Chain 1, turn, slip stitch with relaxed tension in back loop only of each stitch across.
First long edge: Slip stitch in YoSS row end (inserting hook straight through the ridge of stitches), [YoSS under 2 loops of middle section of dc, YoSS under 2 loops of bottom section of dc, YoSS in next YoSS row end]. Repeat between brackets to corner, rotate work.
First short edge: YoSS in back loop only of each stitch across to next corner, rotate work.
Second long edge: [[YoSS in slip stitch row end, YoSS under double side loops at middle of special turning chain, YoSS under double side loops at top of special turning chain.]] Repeat between double brackets to next corner, YoSS in next slip stitch row end, rotate work.
Second short edge: YoSS in back loop only of each stitch across (do not stitch into marked ch-1).
Make Long Loop Join: remove hook, enlarge working loop to about 3/4". Skipping ch-1 and first edging slip stitch, insert hook from WS to RS through top loops of first YoSS of this round, pull long loop through. Insert hook up through back bar and back loop of originating stitch, pull long loop down and through (long loop will pass over ch-1 and slip stitch; tip of long loop becomes new working loop). Adjust join if needed to match surrounding stitches in size.
Make invisible join: Cut yarn, leaving a 6" tail. Gently pull yarn tail up and out of stitch, without distorting stitch. Skipping starting hdc, insert hook from WS to RS through top loops of first Corded Hdc of this round, pull yarn tail all the way through. Insert hook, from bottom to top through back bar and back loop of originating Corded Hdc, pull yarn tail down and through. Turn work so WS is facing you; pull yarn tail sideways and down through next horizontal loop to the right (to the left if you're crocheting left-handed).

Beautiful pattern sweet friend. Love the video and photo support, too. Blessings always. :)
ReplyDeleteThanks so much, Vicki!
DeleteLove it!
ReplyDeleteThank you!
DeleteAre you sure you meant to say that your scarf is 16 inches wide, not 6 inches?
ReplyDeleteIt's 16 stitches wide (which, after edging is added, works out to a 4½" width). Thanks though!
DeleteWhat a beautiful neat scarf, the corded hdc finishes it off beautifully. Thank you for the pattern I have pinned it to do later.xx
ReplyDeleteThank you, Linda!
DeleteThat's a pretty scarf. And nice yarn.
ReplyDeleteThanks Tammy!
DeleteI agree! Beautiful stitches, and gorgeous yarn!
ReplyDeleteThanks Deb!
Delete