
How quickly we adjust to changing circumstances. A few weeks ago I was happily cavorting in sandals and cropped pants, but now that autumn has come - that season of mists and sharp frosty nights, never mind the mellow fruitfulness - my thoughts are all directed towards keeping warm. (And the older I get the warmer I like to be.)
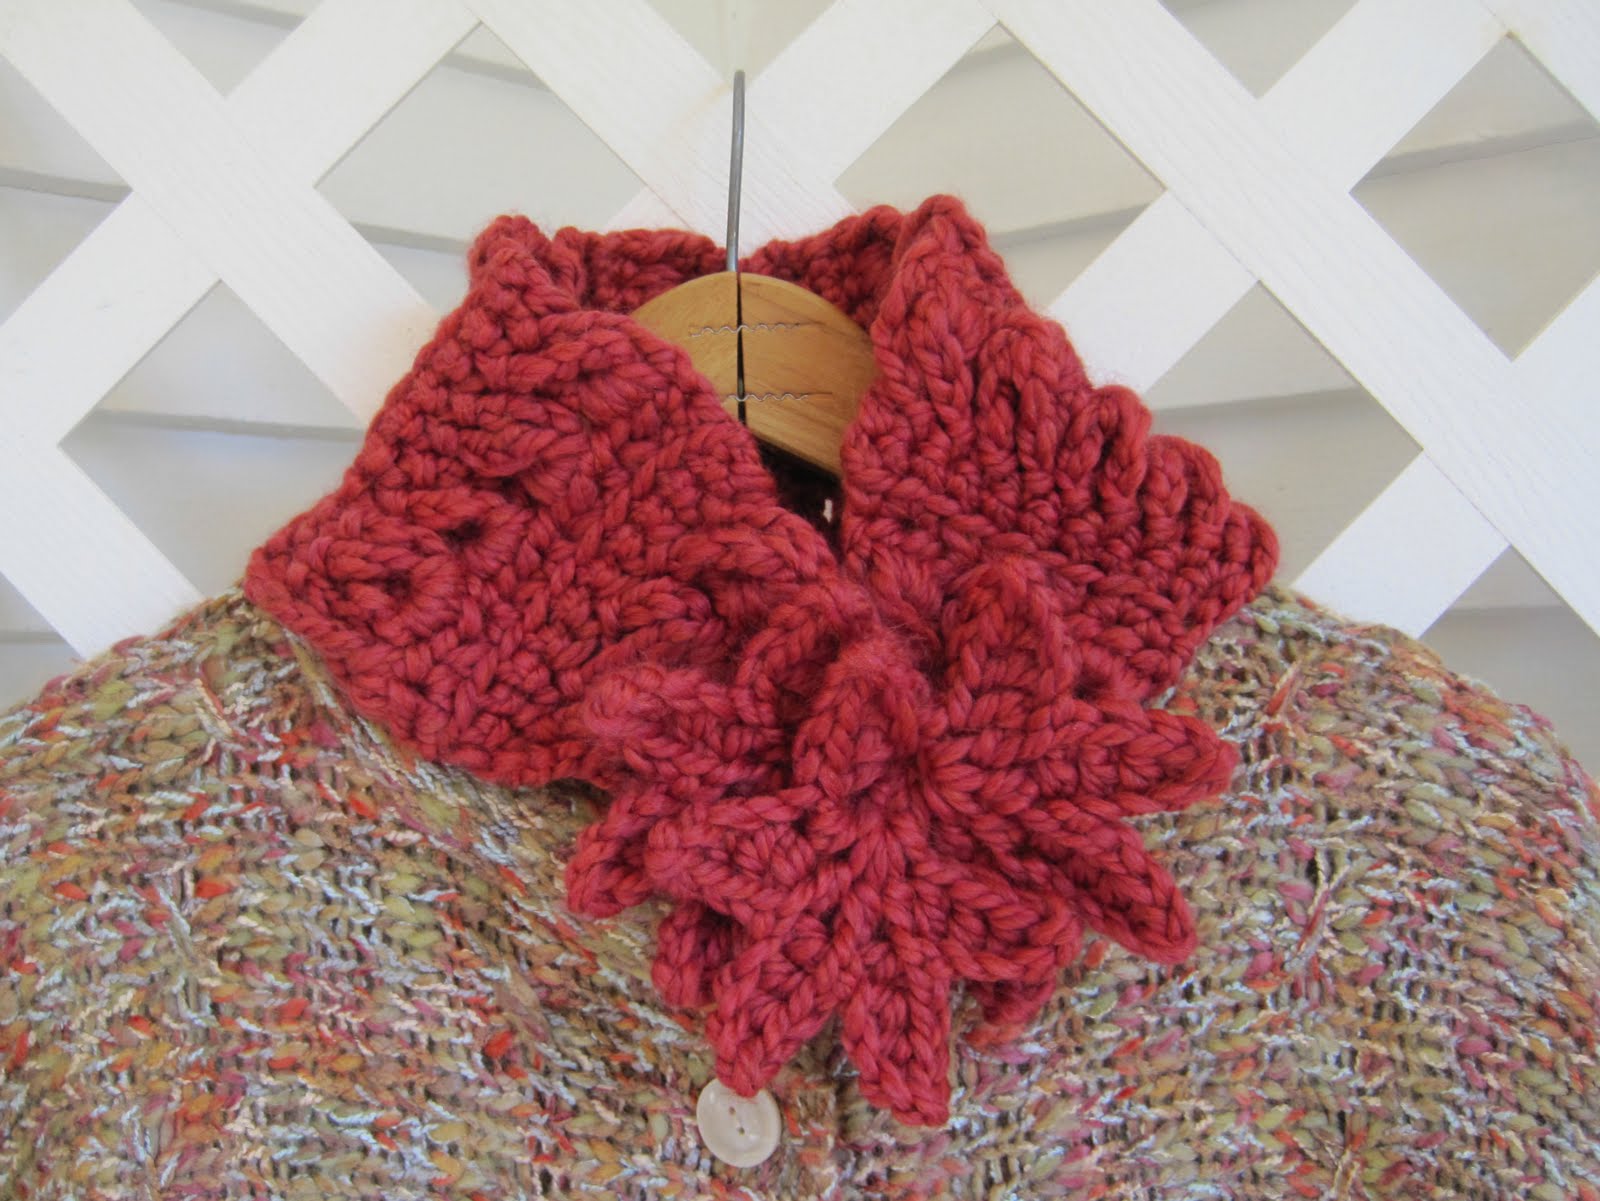
The Curly Maple Scarflet, textured and toasty, is wonderful for covering vulnerable pulse points and making you feel cozy all over - like a little afghan for your neck. It features interlocking maple leaves at the ends, and in between, a cushy, chained variation of broomstick lace which I haven't seen anywhere else. (If you've seen it somewhere I'd love to hear about it.) The leaves curl up a bit over time, just like real leaves do after falling from the tree.

Spicy Maple, about 19" long (excluding leaves) and 5" wide, was made with just under 1 skein of Loops & Threads Cozy Wool, a super-bulky yarn bought at Michael's. This yarn was a tad splitty, but fairly easy to work with, and came in the exact colour I wanted (which is a plus). The purple swatch was crocheted with 2 strands of Stitch Nation Bamboo Ewe, which yielded a slightly narrower (4 1/2" wide) and more supple fabric. I used a size N hook for both.

Curly Maple curves nicely against the neck, and can be worn flat, or folded down around the top.


Don't be put off by the lengthy instructions. This pattern is somewhat fiddly, but not at all difficult. Once you get to the regular pattern repeats, you'll find it goes very quickly.
As usual, we'll start with some charts, then the crochet shorthand pattern, and finish up with the photo tutorial and instructions in plain English.
Happy crocheting!

Curly Maple Pattern Charts


Curly Maple Shorthand Pattern - American Crochet Terminology
Yarn: Soft super-bulky (#6) yarn, or 2 strands of a soft #4 yarn held together
Hook: Size N
Note: When making leaves, chain very loosely. This will help keep the curling under control.
Note: When making leaves, chain very loosely. This will help keep the curling under control.
First Leaf, step 1: *Ch 5. Do not turn. Sc BLO in next ch from hook; hdc BLO; dc BLO (twice); first lobe made. Rep from * 4 more times = 5 lobes. **Yo, insert hook in hole to the left of lobe, pull through, yo, pull through 2 loops on hook. Rep from ** 3 more times.
Step 2: Yo, insert hook in beginning ch sp, pull through; yo, pull through all loops on hook. Gently tug on yarn to snug it up; ch 1, sc in sp at top of leaf. First leaf made.
Ch 8. Stem made (the first 3 chains are the stem) and first lobe of next leaf started.
Make second leaf as first leaf, through step 1. To finish: Yo, insert hook in beginning ch sp of leaf front to back, insert hook in next ch front to back (3rd ch of stem), pull through these stitches only; yo, pull through all loops on hook. Gently tug on yarn to snug up leaf; ch 1, sc in sp at top of leaf. Second leaf made.
Row 1: (chained broomstick loops) Ch 9, sc in 3rd ch of stem. Ch 9, sc in next ch (middle ch of stem). Ch 9, sc in same ch. Ch 9, sc in next ch (1st chain of stem). Ch 9, sc in sc at top of first leaf. (5 chain loops made.) To make final chain loop, chain 3, make trtr (yo 4 times, insert hook front to back through left side of sc at top of leaf, insert hook front to back through first ch sp of leaf, *yo, draw through these stitches only (may be 2 or 3 loops - I can't remember!), yo, draw through 2 loops on hook; rep from * 4 more times to complete loop. This is the front side of the scarflet. Ch 1, TURN.
Row 2: *Yo; inserting hook from back to front of first 2 chained broomstick loops, hdc 3. Rep from * in next 2 chained broomstick loops (2 times) = 3 arches of 2 loops each, total 9 stitches across. This is the back side of the scarflet. Ch 1, TURN.
Row 3: Sc, *sc incr, (sc 2 in same stitch), sc decr. Repeat (2 stitches remaining in row below). End with sc incr, sc. You should now have 10 stitches across. This is the front side of the scarflet. Ch 1, TURN.
Row 4: Sc across FLO. 10 stitches across. Ch 1, TURN.
Row 5: Ch 9, sl st in same st. Ch 9, sl st in next st (8 times) = 9 chained broomstick loops. Final loop: ch 3, trtr (triple treble crochet - yo 4, insert hook in next st, draw through, *yo and draw through 2 loops, repeat from * until all loops worked off hook). You should now have 10 chained broomstick loops in this row. Ch 1, TURN.
Row 6: Same as Row 2, except that you will be crocheting across 10 loops instead of 6. You will end up with 5 arches of 2 loops each, total 15 stitches across (5 x 3 hdc per arch). Ch 1, TURN.
Row 7: Sc, *sc, sc decr. Rep from * across until 2 stitches remain in row below. Sc in last 2 stitches = 11 stitches across. Ch 1, TURN.
Row 8: Sc across, FLO. 11 stitches across. Ch 1, TURN.
Row 9: Ch 9, sl st in NEXT stitch (9 times) = 9 chained broomstick loops. Make final loop as in Row 5. Ch 1, TURN.
Row 10: Same as Row 6.
Row 11: Same as Row 7.
Row 12: Same as Row 8.
Following rows: Repeat Rows 9-12 until scarflet is desired length. (I stopped when it fit snugly around my neck from the base of the leaves to the end of the last row of loops.) You will be doing one more set of rows after this, which will add about 2" to the final length.
Finishing (Decrease) Row 1: Ch 9, sl st in next st. Ch 9, sl st in 2nd stitch (1 stitch skipped) 4 times total. Make final loop as in Row 5 (ch 3, trtr in last stitch) = 6 chained broomstick loops. Ch 1, TURN.
Finishing Row 2: Hdc 2 in first arch (first 2 chained broomstick loops). Hdc decr in this arch and at beginning of next arch (yo, insert hook through first arch, pull through, yo, insert hook through next arch, pull through, pull through all loops on hook). Hdc in 2nd arch, hdc decr in 2nd arch and 3rd arch. Hdc in 3rd arch. 7 stitches across. Chain 1, TURN.
Finishing Row 3: Sc 2, sc decr, sc 3. 6 stitches across. Chain 1, TURN.
Finishing Row 4: Sc decr FLO, sc 2 FLO, sc decr FLO = 4 stitches across.
Final Leaf: Ch 5, TURN. Right side of work now facing you. First lobe stitches are made in the back "bump" of this chain only. Sc in 4th ch, hdc in 3rd ch, dc in 2nd and 1st ch. First lobe made. Make 4 more lobes as in First Leaf above, stitching into BLO. 5 lobes made. *Yo, insert hook through hole to left of lobe, pull through, yo, pull through 2 loops on hook. Rep from * 3 more times.Yo, insert hook through 2 strands of 1st chain of 1st lobe, draw through, yo, draw through 2 loops on hook, yo, draw through 5 loops on hook, yo, draw through last 2 loops on hook. Sl st to other end of row. Cut yarn and weave in ends.
To wear, gently pull the 2 maple leaves at one end through the space made by the maple leaf at the other end.

Curly Maple Photo Tutorial
First Leaf:
LOOSELY chain 5.

Do not turn. Single crochet in back loop only in next chain from hook;
Half double crochet in back loop only in next chain;
Double crochet in back loop only in next 2 chains.
First lobe made.

Repeat the above steps 4 more times...


...until you have 5 lobes. (Don't they look like a little string of bunting?)
We're going to gather them up into a leaf by making some partial double crochets in the holes between each lobe.

Yarn over, insert hook into hole between 2 previous lobes,
yarn over, pull through,
yarn over, pull through 2 loops on hook. First partial double crochet made.


Repeat the above steps 3 more times, once in each hole between the lobes. Now your leaf should look like this:

Now to finish. Yarn over, pull through beginning chain space,
yarn over, and gently pull through all loops on hook.


Gently tug on yarn to snug it up;
chain 1, then single crochet in the space at top of leaf.

First leaf made!
Stem and Second Leaf:
LOOSELY chain 8. The first 3 chains are the stem; the next 5 are the basis for the first lobe of the next leaf.

Make 5 lobes just as you did in the first leaf. Remember to chain LOOSELY (this will help the leaves to lie flat).

Gather the lobes with partial double crochets in the first 4 holes, just like you did in the first leaf.
Now stop and look at the arrows. You're going to insert your hook into both those stitches in the next step. You can click on any picture to make it larger.

Yarn over, insert hook from front to back in beginning space of first lobe,
then insert hook from front to back in the chain right next to it.
The hook should go through the back loop and the back bump of the chain stitch.
Pull through these stitches only (first 3 loops on hook);
Yarn over, pull through all loops on hook.
Gently tug on yarn to snug up leaf;

Chain 1, single crochet in space at top of leaf.
Your second leaf is made!

Now for the interesting part: the chained broomstick technique. Stop and look at your 2 leaves. They're joined by a stem made of 3 chains. The 3rd chain (the one on the right) already has a stitch through it, but you're going to be putting another stitch in there. Ready?
Increase Pattern Rows:
Row 1: Chain 9, single crochet in 3rd chain of the stem, (the one you attached the leaf to).
Chain 9, single crochet in NEXT chain (middle chain of stem).
Chain 9, single crochet in same chain (the middle one).
Chain 9, single crochet in NEXT chain (1st chain of stem).
Chain 9, single crochet in the single crochet at top of first leaf.
Your scarflet should look like this, with 5 chain loops squeezed into those 3 chains and the tops of the leaves:

Now take a close look at the first leaf. Your next stitch will be attached in 2 places: the left "legs" of the single crochet at the top of the leaf, and the hole made by the first chain space of the first lobe.

To make final chain loop: chain 3,
yarn over 4 times,

insert hook front to back through left "legs" of single crochet at top of leaf,
insert hook front to back through first lobe space of leaf,
yarn over, draw through those stitches only (the first 3 loops on hook),
*yarn over, draw through 2 loops on hook;
repeat from * 4 more times to complete loop.
Now you have 6 loops. This is the front side of the scarflet, by the way.

Chain 1, TURN.
Time for the next step: turning those loops into tidy little arches. The technique is the same as for broomstick lace. You'll be taking 2 loops at a time and crocheting across the tops of them to make the arches.
Take a moment to flatten out the loops. Make sure they aren't twisted - that will happen later.
Your hook will be inserted from BACK to FRONT of the loops. Another way of looking at it: the right side, or leg, of each loop, will be turned towards you and the hook will go from right to left through the loops. As you stitch across the loops, they will be twisted into a very pretty pattern.


Here we go.
Broomstick Arches:
Row 2:
*Yarn over, insert hook from back to front of first 2 chained broomstick loops (or, if right legs are facing you, from right to left),
half double crochet 3 in loop space. First arch made.


Repeat from * in next 2 chained broomstick loops. Second arch made.


Repeat from * in last 2 loops. Third arch made.


You should now have 3 arches (2 loops to an arch), and a total of 9 stitches across (3 half double crochets per arch).
This is the back side of the scarflet.
Chain 1, TURN.
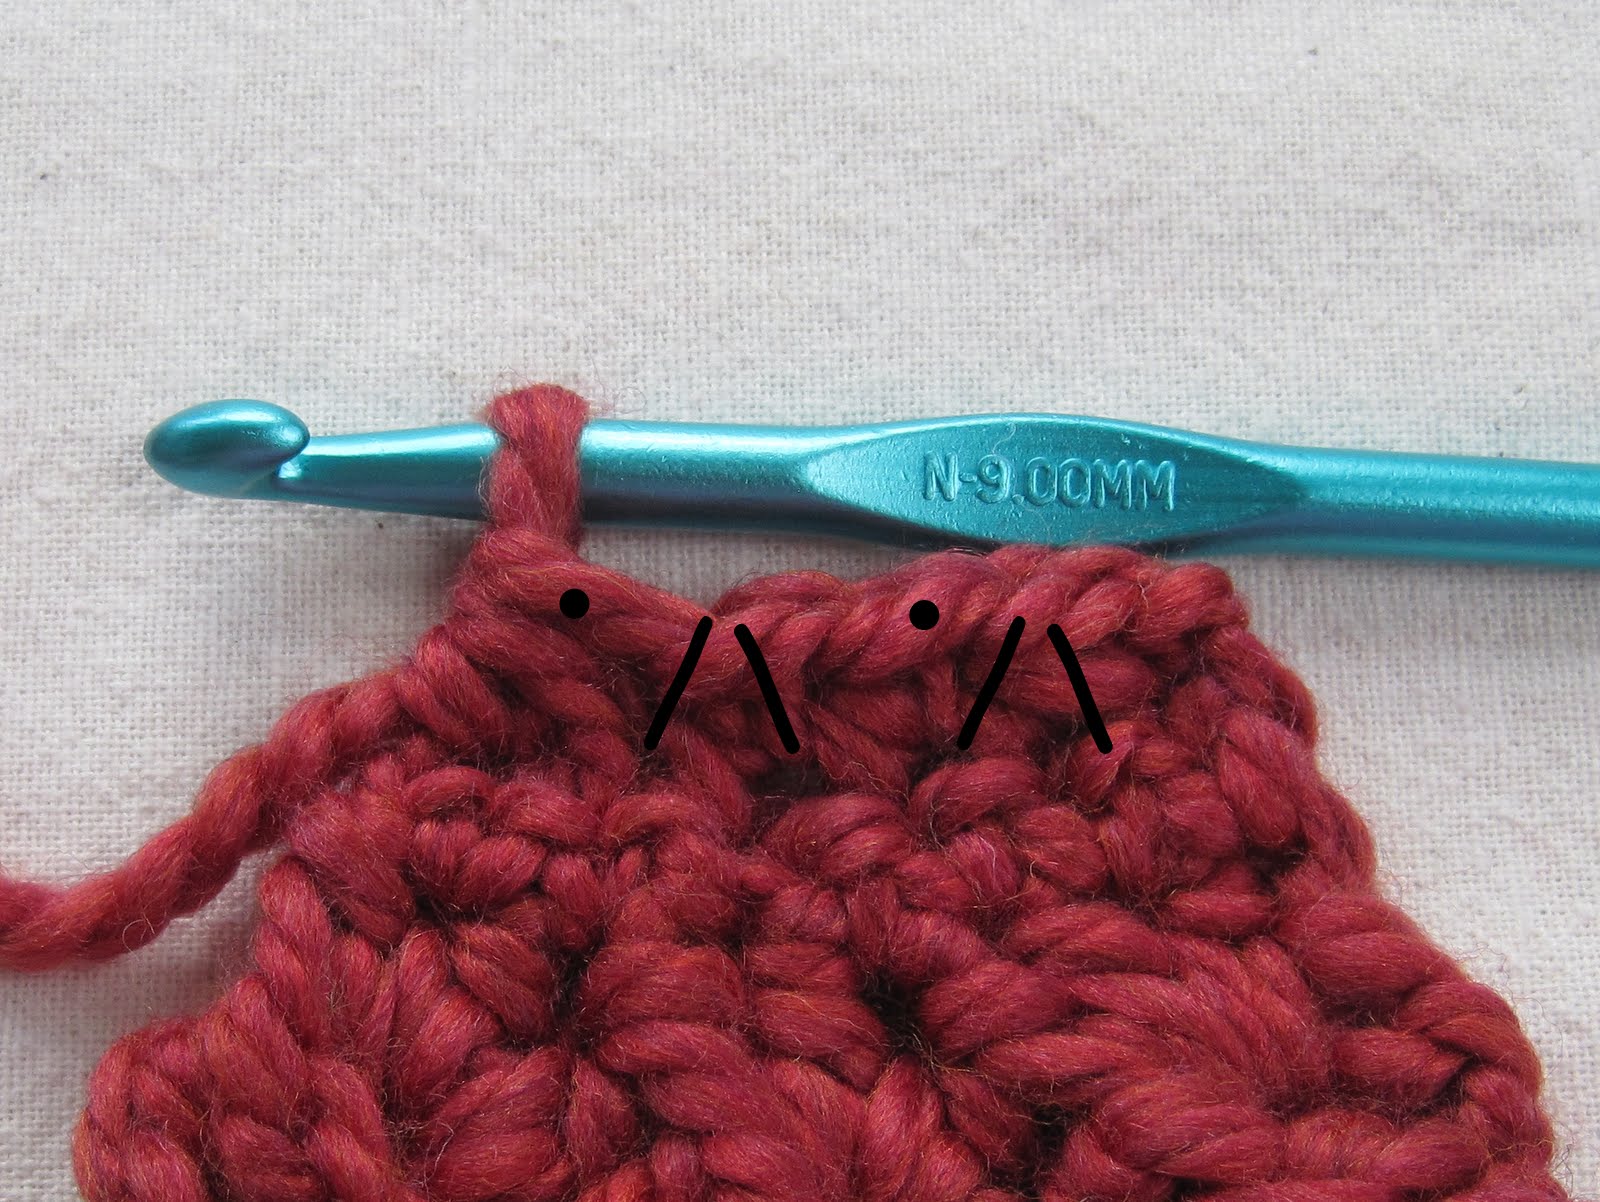
Now for some funky increases and decreases.
Row 3:
Single crochet in first stitch,
*single crochet increase in next stitch, (which means single crochet 2 in the same stitch),
single crochet decrease over next 2 stitches (make partial single crochet in next 2 stitches, then draw the thread through all the loops on your hook).
Repeat. Now you should have 2 stitches left.
Make one more single crochet increase,
then a single crochet in the last stitch.
You should now have 10 stitches across. This is the front side of the scarflet. Don't those arches look nice?

Ch 1, TURN.
Row 4:
Single crochet across in Front Loops Only (10 stitches across).

Chain 1, TURN.
Notice the nice little line made by single crocheting in the front loop only.

Now to start the regular pattern rows. They're much more straightforward and will go very quickly.
Pattern Rows:
Row 5:
Chain 9, slip stitch in same stitch. First loop made. (FYI: This is the only time you'll slip stitch in the first stitch of the row. In future rows, you'll always attach the loop into the 2nd stitch.)

Chain 9, slip stitch in next stitch (8 times) = 9 chained broomstick loops.

Final loop: chain 3, make triple treble crochet in last stitch.
(Yarn over 4, insert hook in next stitch, draw through,
*yarn over and draw through 2 loops,
repeat from * until all loops worked off hook).
You should now have 10 chained broomstick loops in this row.

Ch 1, TURN.
Now we're going to make the arches just like we did before.
Row 6:
Make same as Row 2, except that you will be crocheting across 10 loops instead of 6. You will end up with 5 arches of 2 loops each, total 15 stitches across (5 arches with 3 half double crochets per arch).

Ch 1, TURN.
Row 7:
In this row, we're decreasing from 15 stitches across down to 11 stitches across.
Single crochet,
*single crochet, single crochet decrease.
Repeat from * across until 2 stitches remain in row below.
Single crochet in last 2 stitches.
Now you have 11 stitches across.

Ch 1, TURN.
Row 8:
Single crochet across in the Front Loops Only. 11 stitches across. Ch 1, TURN.

Row 9:
Chain 9, slip stitch in second stitch.

Chain 9, slip stitch in next stitch 8 more times = 9 chained broomstick loops.
Make final loop as in Row 5.
Chain 1, TURN.
Row 10:
Same as Row 6.
Row 11:
Same as Row 7.
Row 12:
Same as Row 8.
You're on a roll now. See how nice it's looking?

Following rows: Repeat Rows 9-12 until scarflet is desired length. My scarflet had 5 full sets of pattern rows (I stopped when it fit snugly around my neck from the base of the leaves to the end of the last row of loops.) You will be doing a decreasing set of rows after this, which will add about 2" to the current length.
Finishing (Decrease) Rows:
Finishing Row 1:
Chain 9, slip stitch in second stitch.
Chain 9, skip 1 stitch, slip stitch in 2nd stitch 4 times total. Make final loop as in Row 5 (ch 3, trtr in last stitch) = 6 chained broomstick loops. Ch 1, TURN.

Finishing Row 2:
Half double crochet 2 in first arch.
Half double crochet decrease over this arch and beginning of next arch (yarn over, insert hook through first arch, pull through, yarn over, insert hook through next arch, pull through, pull through all loops on hook).
Half double crochet in 2nd arch,
half double crochet decrease over 2nd arch and 3rd arch.
Finish with half double crochet in 3rd arch.


You should now have 7 stitches across. Chain 1, TURN.
Finishing Row 3:
Single crochet 2,
single crochet decrease,
single crochet 3.
You should now have 6 stitches across. Chain 1, TURN.

Finishing Row 4:
Single crochet decrease in Front Loops Only,
single crochet 2 in Front Loops Only,
single crochet decrease in Front Loops Only.
Now you should have 4 stitches across.
Final Leaf:
Chain 5, TURN. Now the right side of the scarflet is facing you.
On the first lobe ONLY, make your stitches in the back "bump" of the chain:
Single crochet in next chain,
half double crochet,
double crochet,
double crochet. First lobe made.

Make 4 more lobes as in First Leaf above, stitching into Back Loop Only on these lobes. 5 lobes made.
Now it's time to finish this thing!
*Yarn over, insert hook in previous space between lobes,
yarn over, pull through 2 loops on hook.
Repeat from * 3 more times. All the lobes are now gathered except the last one:

Take a look at the beginning of that first lobe. Your hook will go through the 2 inside legs of the first chain, as in the picture below:

Yarn over, insert hook through 2 strands of 1st chain of 1st lobe, draw through (7 loops now on hook),
yarn over, draw through 3 loops on hook (5 loops now on hook),
yarn over, draw through 5 loops on hook (2 loops now on hook),
yarn over, draw through last 2 loops on hook.

Slip stitch to other end of final row. Cut yarn and weave in ends. Heave a big sigh of relief, and run to the mirror to try it on.

To wear, gently pull the 2 maple leaves at one end through the space made by the maple leaf at the other end. You can wear it with the leaves centered under your chin, or shifted fetchingly to one side.
Block if desired (I blocked only the leaves) and enjoy being warm!

P.S. Please feel free to use the comment space if you find any mistakes or have any questions. You can also send me a message in Ravelry. And no, I didn't knit the sweater, although I wish I had. But I did make the quilts. :)
~ ~ ~ ~ ~ ~ ~ ~ ~ ~ ~ ~
this is so pretty- and just perfect for the fall! your designs are wonderful- i love every one of them. thank you for sharing this pattern and diagrams (wish that when i tried to draw diagrams that they turned out so nice.) have a wonderful week!
ReplyDeleteThank you so much, needlekrafter! I draw them in pencil and only go over them in pen when they're done. (I should look into charting software.)
ReplyDeleteMRS Micawber,
ReplyDeleteThank you so much for this pattern. I just found
your site today and have been looking for scarf
patterns to make for Christmas presents and downloaded 3. They are beautiful and I appreciate
your sharing your talent.
I've said it before and I stand by it....you do the BEST crochet tutorials on the internet!! And I've been around!! lol!!!! Thank you so much for making your tutorials so detailed!!! :)
ReplyDeleteThis is SO CUTE!! I love the scarflet and I think my mom would love it, too!! Growing up she was always freezing and I thought she was just a wimp....now, guess what?? Yea, I'm always cold!!! Aaaahhhh, life...you are a funny girl!!! :)
Peggie - so glad you can use them.
ReplyDeleteThanks Laura. :)
I love the texture of this scarflet. And I agree, you have magnificent charts. Why use software when you can draw like that!!!
ReplyDeleteSo pretty! Love this one.
ReplyDelete-Leslie (your F.N.)
Amazing pattern! Can't wait to make one.....a perfect simple gift to make too! I quite sure I'll be making this soon and will link to you from my blog when I do. In the mean time, do check out my rag rug from sheets and would love to see you at my international linky party.....you'll get some nice exposure from all my lovely readers! all the best!
ReplyDeleteThanks Sara!
ReplyDeleteLovely design.. Thanks for sharing the pattern.. :-)
ReplyDeleteWow, you are awesome! Gorgeous work, thank you so much for sharing your patterns.
ReplyDeleteThanks very much to both Anonymous commenters.
ReplyDeleteSuperbe scarf, in my to do list for 2012 ... félicitations pour le tuto et merci.
ReplyDeleteDe rien! :)
DeleteJust starting making this in chunky mustard and just wanted to let you know how so very generous you are to have made such an amazing step by step tutorial....I know how long that takes! When it's done and photographed and I link to your tutorial I'll let you know! all the best!
ReplyDeleteThanks, Sara - I look forward to seeing your photos. (Shall have to pop over and check - perhaps they're posted already.) :)
DeleteMrs. M! You do indeed have the best tutorials on the net and God Bless you for sharing your designs and patterns. I've made several of your scarf designs and they've come out beautifully and not a dull moment while making them!
ReplyDeleteLynnmarie
Thanks so much! :)
Delete