

Now we're moving on to our second bracelet, a tiny bit more complicated, but very quick and easy. I call it the Shells bracelet. Not because I used shell stitches (actually they're clusters), but because it reminds me of a row of little conch shells:

This bracelet is made with two strands of No. 10 crochet cotton (I used DMC Baroque), and a Size F hook. You can use a smaller hook if it feels more comfortable.
The only other materials are: 1 button and 15-25 beads. My beads are size 6°. "E" beads would also work. (Figure on using about 2 beads per inch of bracelet, plus 5-10 more for clasp loop.)
Make your bracelet just a bit snug. The cotton will relax a bit with wearing.
Let's crochet!
String the beads on a double strand of cotton. It's easiest done with a needle. If you don't have a needle that fits through your beads AND can accommodate 2 strands of thread, string them on one strand first. Then thread the needle with the other strand and run it through the beads again. Be careful not to pierce the first thread with the needle as you pass it through the beads.

Make a slip knot, leaving a 4-6" thread tail. Chain 4:

Then make a 2-double crochet (2-dc) cluster in the first chain.
To make a 2-dc cluster: yarn over, insert hook in chain 1, pull yarn through, yarn over, pull yarn through 2 loops. Now you should have 2 loops on your hook, like this:

Repeat the above step. Now you should have 3 loops on your hook:

Yarn over, and pull yarn through all the loops on your hook. Tug on the yarn to close the top of the cluster:

Slide a bead down close to the hook, then chain one (with the bead inside the chain):

 |
| Extreme close-up! |
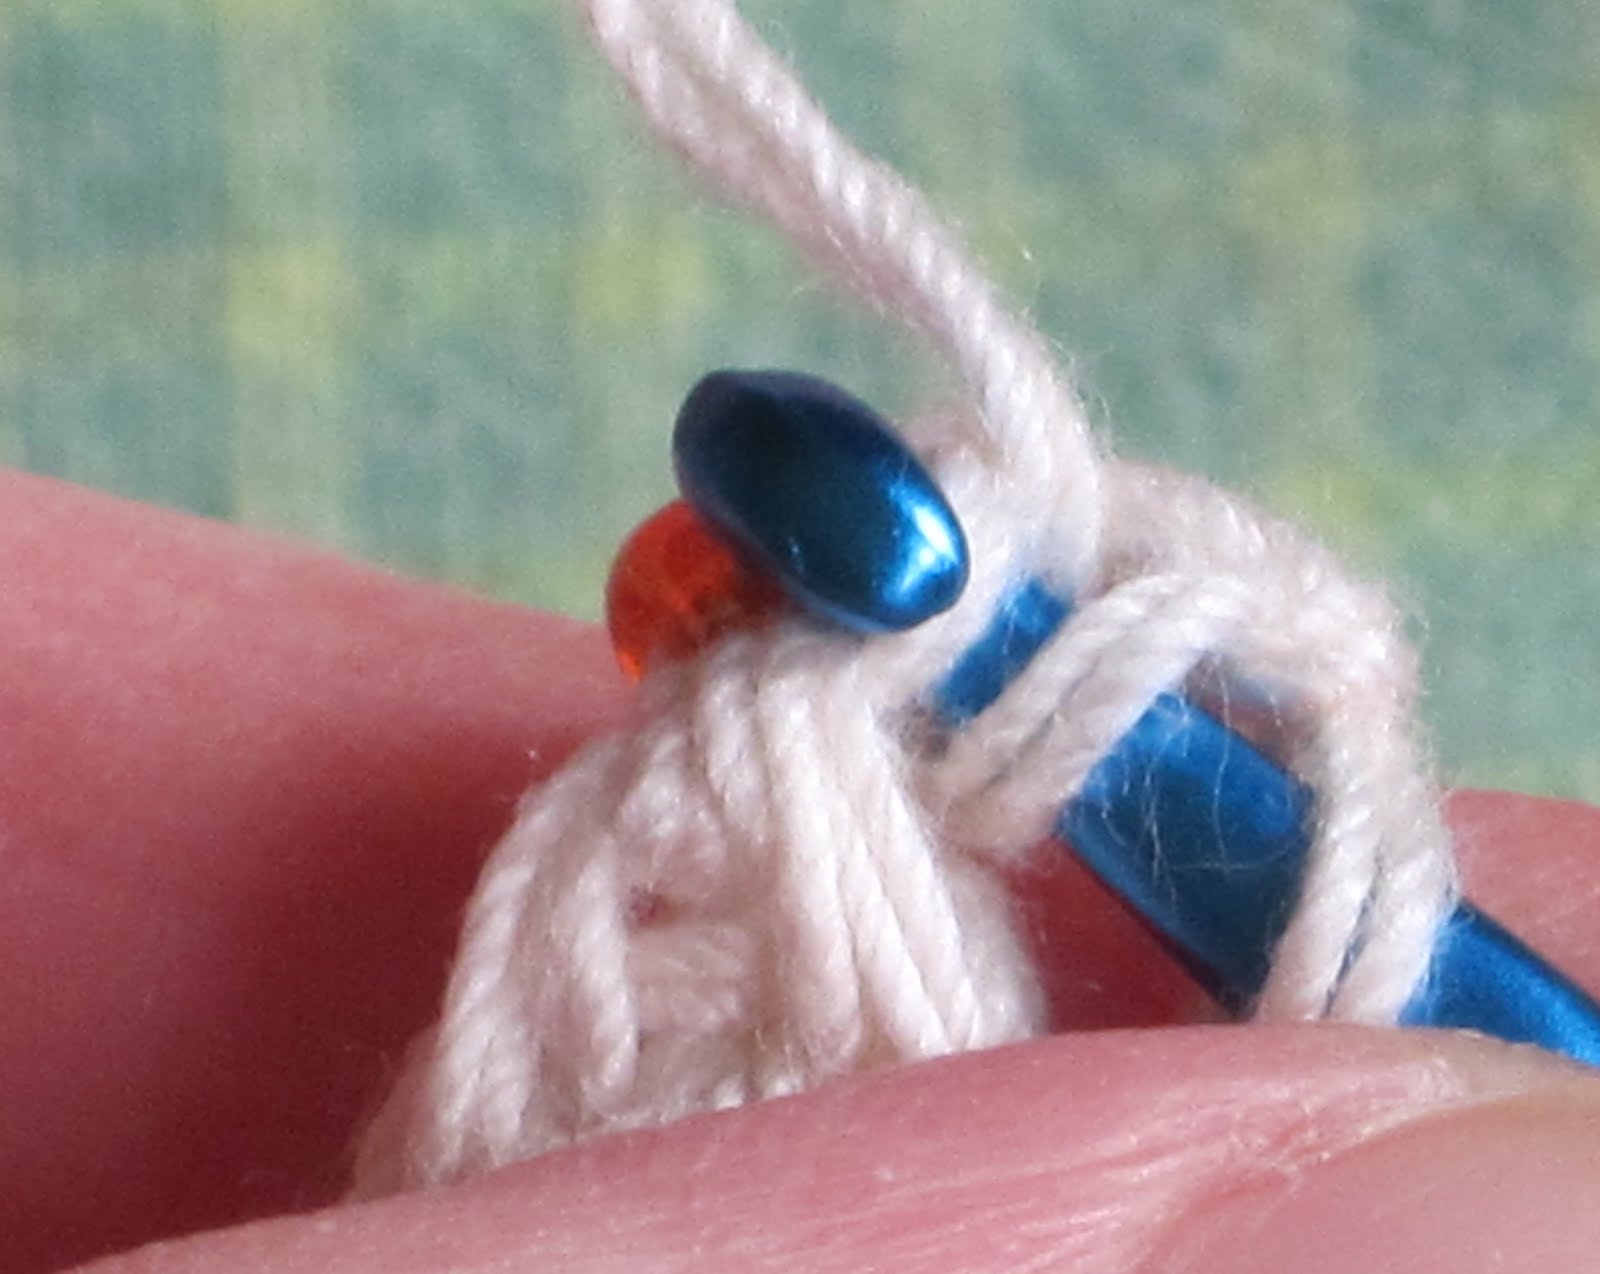
Chain 3:

Yarn over, and insert hook in left side of the chain stitch holding the bead (as shown in extreme close-up above):
Make another 2-dc cluster in this space. Now slide another bead down to the hook and chain 1. Turn your bracelet over, and admire your 2 clusters:

(Because bead crochet pushes the bead to the back of the stitch, this project is designed to be crocheted without turning. So the side facing you as you work will be the back side of the bracelet.)
Turn the bracelet back around. Repeat the above steps (chain 3, 2-dc cluster, chain 1 with bead) until your bracelet just fits around your wrist when slightly stretched. (Of course you may make it looser if you like.)
Now pick out a button, if you haven't already, to use for your clasp.
 |
| And the lucky winner is...the yellow shank button! |
Here's how I attached my button: I inserted the shank of the button into the beginning chain stitch (making sure the button would be right side up with the beads):

I threaded the yarn on a needle, and passed it through the buttonhole as many times as I could, looping it over the shank, until I couldn't get the needle through the hole any more.

Then I removed the needle and tied a knot with the 2 thread ends, right up next to the shank. You could probably cut the thread and leave it like this.
But I was feeling extra
At the other end of the bracelet, I switched to a small steel hook and chained enough beads to slip snugly over the button:

And slip stitched them into a circle. Don't they look cheerful? I love orange.

I crocheted another tight short chain with the thread ends, pulled the thread through, cut it, and hid it in the back of the cluster (just like I did at the other end).
And my bracelet was done. Doesn't the yellow button look like a little sun?

Stay tuned for the next Beachy Bracelet: Waves.
~ ~ ~ ~ ~ ~ ~ ~ ~ ~ ~ ~
This is so pretty! I'm definitely going to make it!
ReplyDeleteIt's very quick and easy. Let me know how it works out for you!
ReplyDeleteHow much thread do you start with (approx how many yards)?
ReplyDeleteGood question - I would say not more than 4 - 5 yards total. You'll fold this in half and work with the thread doubled. (My thread happened to be doubled and rolled up into a ball already so I didn't need to measure it!)
ReplyDeleteHi Sue!
ReplyDeleteI just wanted to let you know that I featured your project on my site, www.AllFreeBeadedJewelry.com. I linked to this project:
http://www.allfreebeadedjewelry.com/Crocheted-Jewelry/Beach-Ready-Crochet-Bracelet
I would like to know if I can link like this to you, including a photo, in the future. Or if you would be willing to allow me to post projects in full on the site - full credit will always be given to you, of course. It would be yet another source of traffic to your blog.
Please let me know, I would love to work with you further.
Thanks!
Maggie Kmiecik
mkmiecik@primecp.com
Thanks for sharing this beautiful bracelet on AllFreeBeadedJewelry cuz that's how I found you; prepared to be popular! ;-) you did a fabulous job!
ReplyDeletePkae
I am thinking of making this into a beaded belt!
ReplyDeleteI think it would make a great little belt. Very skinny, of course - although the pattern should work as well in a thicker yarn. You'd just have to use bigger beads I guess.
ReplyDeleteGreaaaaaaaaaaaat
ReplyDeletei saw the same pattern used for a necklace and i just thought it's a multiple of DCs, that's why i ended up with many twisted shells on my hand!
i am gonna make this for a set of necklace and bracelet today..thank you very much
Love,love,love the pattern! thanks so much for sharing. I'm a 72yr. old breast cancer survivor,celebrating my 10 yr cancer free. I was so excited to start the pattern I didn't read it all the way through, & only used a single thread, of course the F hook didn't work well, so I switched to a 00, it's making up delicate but nice. I will double thread it next time. Im using some shells with small holes drilled in them. I used fray check to stiffen the end of the thread, works great.Nancy,nancyjh2012@gmail.com
ReplyDeleteThanks so much, Crochet Happy! And congratulations on your cancer-free anniversary. Use whatever hook works best for you.
DeleteI like anything that looks or seems like shells, nautical knots, etc. I recently just learned how to crochet with beads and wire. You just use the wire instead of crochet cotton or thread. I also am trying different textures of yarn for different looks.
ReplyDeleteThanks for commenting! I dabbled in wire crochet last year and would love to do more of it. Here's a link to a free wire crochet pattern I posted:
Deletehttp://mrsmicawber.blogspot.com/2012/04/birds-nest-wire-crochet-earrings.html
:)
i really enjoyed your whole blog page. i like your humor. this bracelet is so cute and perfect for the light accesory i wanted to add to my summer dress, thanks for sharing.
ReplyDeleteThanks so much, garnet! :)
DeleteIt's absolutely gorgeous and stunning Beachy Little Bracelet. I loved all the bracelets.
ReplyDeleteoakland jewelry making classes
Thank you for the awsome tutorials, they are very explicite. I've already tried to make the sea anemone, and the beachy little bracelet, they are very cute!!
ReplyDeleteAmazing !!
ReplyDeleteCan i use the pattern for selling??
You may sell the items you make from this pattern, but you may not sell the pattern or reproduce its text without permission. If you do sell items made from the pattern, please credit the designer (that's me).
DeleteThanks for asking! :)